
VIRTUAL MIST EDGE FOOTPRINT
The following are the minimum hardware requirements for a Mist Edge VM. Failure to meet any of the requirements below will make Mist Edge non-operational.
Supported Hypervisor: VMware ESXi, tested versions – 6.7.0 and 7.0.
Sizing for a Production is as below:
| CPU | 4 vCPUs |
| RAM | 32 GB |
| Hard Disk | 100 GB (Thick provisioned) |
| NIC | Three virtual NICs are needed |
CPU support: Mist Edge needs 1G Huge Pages support from the CPU, hence the minimum supported CPU is Intel Haswell family and above.
Note: Mist Edge does not support older Intel CPUs or AMD CPUs.
NIC support: Mist Edge needs DPDK support, please refer to the following link to see if your NIC card is supported.
Preferred NIC cards: Intel x520 Dual Port 10GbE SFP+, Intel i350 Dual Port 1GbE, Intel i350 Quad Port 1GbE, rNDC QLogic Quad Port 10GbE SFP+, rNDC Intel i350
Getting access to Mist Edge on the Mist Dashboard
To see the Mist Edge configuration options on the dashboard, Organization must have a valid subscription (S-ME-x), Mist Edge subscription is per AP that is tunneling user traffic towards the Mist Edge.
For trials, please work with Mist SE or AM and send the trial subscription request via this form:
https://ai.mist.com/subscription-change-form
MIST EDGE VM – Networking Overview
Mist Edge requires the following three virtual NIC interfaces:

Out of Band Management (OOBM) Port Group – needed for the Mist Edge connection to the Mist Cloud and Radius Proxy service.
Tunnel IP Port Group – needed for Mist Tunnel (L2TPv3 or IPSEC) establishment from Mist Access Points
Upstream Port Group – uplink to the wired network with all the VLANs that need to be extended for clients.
Firewall ports requirements
Ensure firewall is configured to allow the following connections:
- On OOBM interface needs to have outbound access to ep-terminator.xx.xx (refer the link below) on TCP port 443
- Tunnel IP interface needs to allow incoming traffic on UDP Port 1701 for non IPSEC campus or branch use case.
- For remote teleworker use-cases with IPSEC encryption Tunnel IP interface needs to allow incoming traffic on UDP port 500 and UDP port 4500, as well as the firewall needs to do a port translation from outside to Tunnel IP address.
For Remote users with WPA2/WPA3-Enterprise or MAB wlan security, Radius Proxy is being used, OOBM (or Tunnel if Tunnel IP as source enabled) interface should be able to access the Radius server, as well as have firewall doing port translation on TCP port 2083 towards Tunnel IP address.
Verify the up-to-date ports and firewall requirements at below link:
https://www.mist.com/documentation/ports-enable-firewall/
MIST EDGE VM DEPLOYMENT EXAMPLE
Step 1 – Configure VM Networking – Example Topology
Mist Edge requires three Port Groups to be created on the VMware. Actual binding of Port Groups to individual vSwitches/dvSwitches or to physical NICs does not matter, it should be adapted based on the customer and network requirements.
In this example, we have the following network topology:
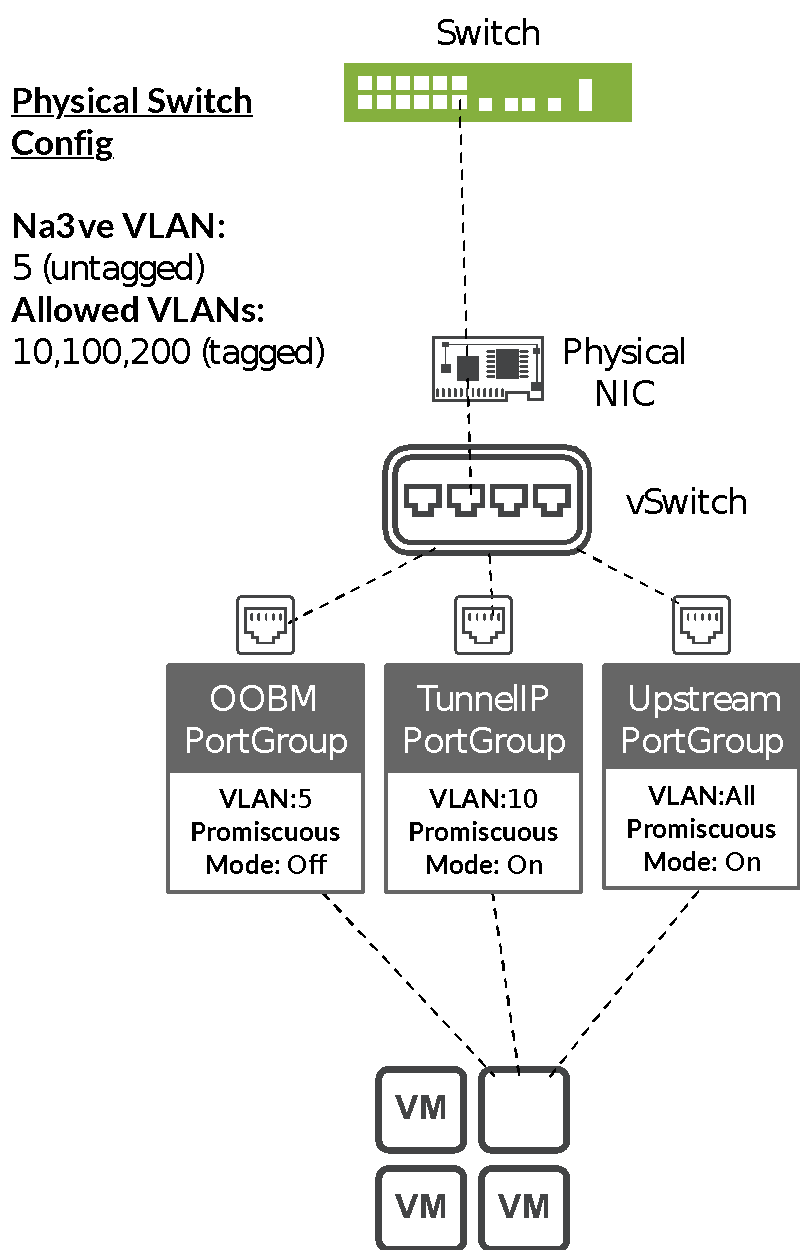
VMWare Port Group Configuration Example.
OOBM Port Group:
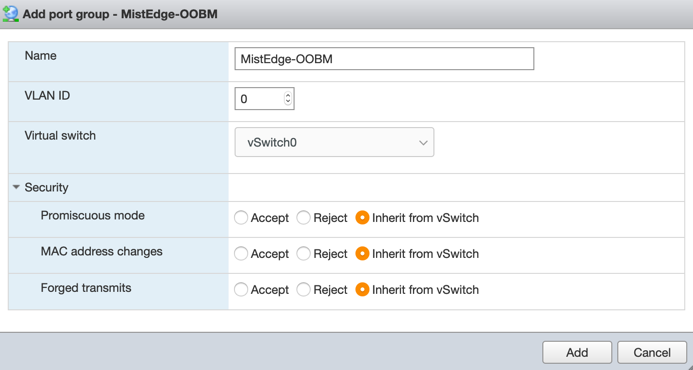
Note: in this example VLAN ID is set to “0” on the VMWare side, while the actual untagged VLAN on the switchport is 5. This is how VMWare handles untagged traffic, it should always be marked configured as “0”.
Tunnel IP Port Group:
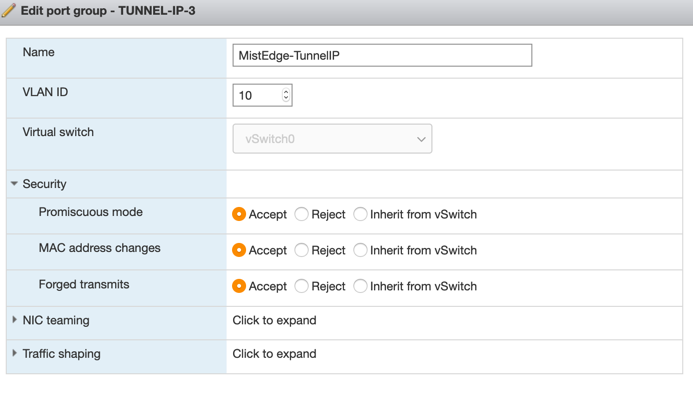
Note: Toggle Promiscuous mode to accept. In this example, incoming tunnel connections from the Access Points will land in this Tunnel IP Port Group. VLAN ID 10 will look as “untagged” to the Mist Edge but will be tagged as VLAN 10 between the VMWare and the physical switch.
Upstream Port Group:
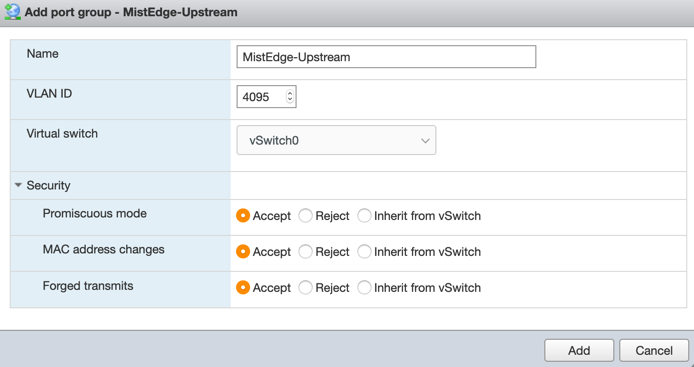
Note: upstream port is usually configured as trunk to tag all VLANs (ESXi and basic vSwitch has a 4095 VLAN ID that tags all VLANs automatically, while dvSwitch on a large scale vCenter deployments allows for VLAN range to be configured)
Handling Multiple Uplinks and LAG Configuration
While VMWare supports multiple uplinks with a static or dynamic link aggregation, the default behaviour for Port Groups in promiscuous mode will cause issues with any broadcast or L2 multicast traffic.
By default, VMWare vSwitch or dvSwitch will copy any outgoing broadcast or multicast frame to all the uplinks, including the one it came in from. This needs to be disabled to allow client traffic to be tunnelled without causing any loops on the network.
More information about this behaviour is available in the following VMWare KB article.
https://kb.vmware.com/s/article/59235
Important: it is mandatory to make this change, whenever multiple uplinks are in use with VMWare (ESXi or VCenter).
Enabling ReversePathFwdCheckPromisc on VMWare ESXi UI:
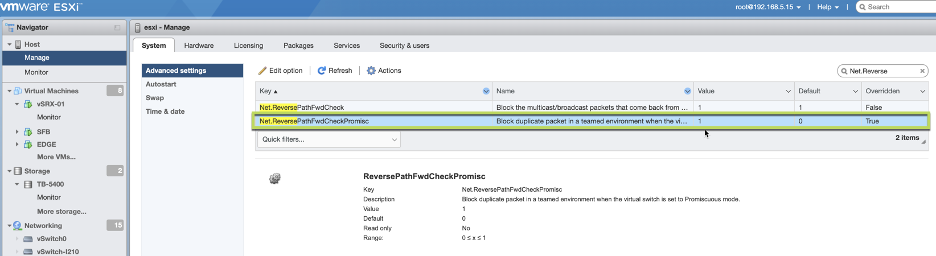
- From the Navigator window select Manage > System > Advanced settings.
- Scroll down or use the search bar to go to the Net.ReversePathFwdCheckPromis option.
- Select Net.ReversePathFwdCheckPromisc and click Edit option.
- In the Edit option – Net.ReversePathFwdCheckPromisc window update the new value field to 1 and click Save.
Important: For the setting to take effect, promiscuous mode must be toggled off and on by the guest operating system. An operation such as a guest OS reboot or a vMotion to another ESXi host with the /Net/ReversePathFwdCheckPromisc setting enabled is sufficient.
The setting does not require a reboot of the ESXi host to take effect.
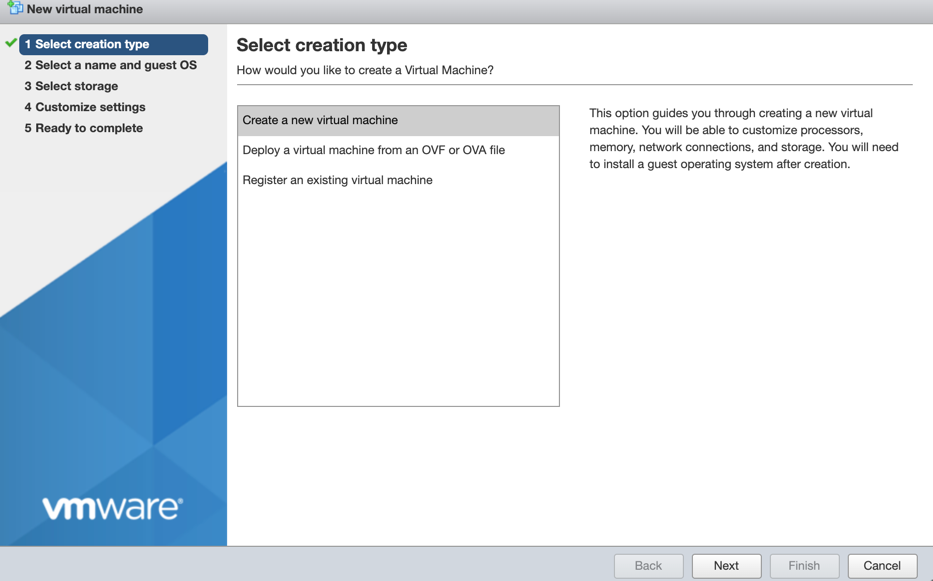
Step 2 – Create a Mist Edge VM
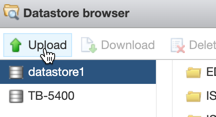
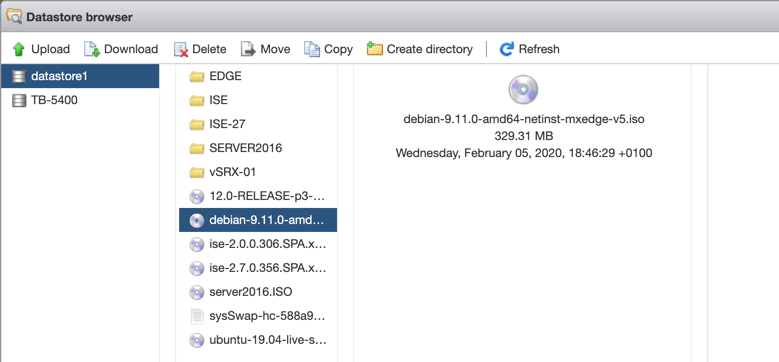
Upload the ISO to the VMWare storage:

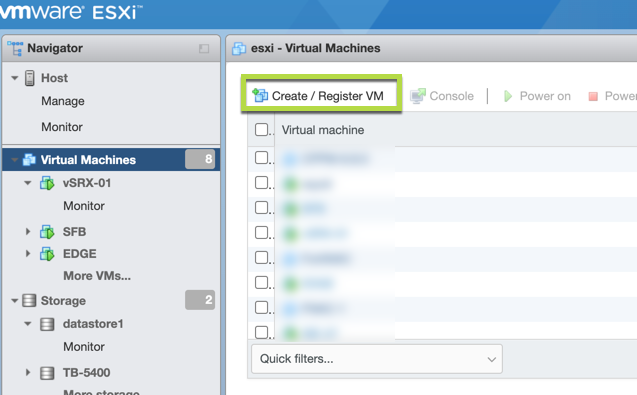
Create a new VM with the following settings:
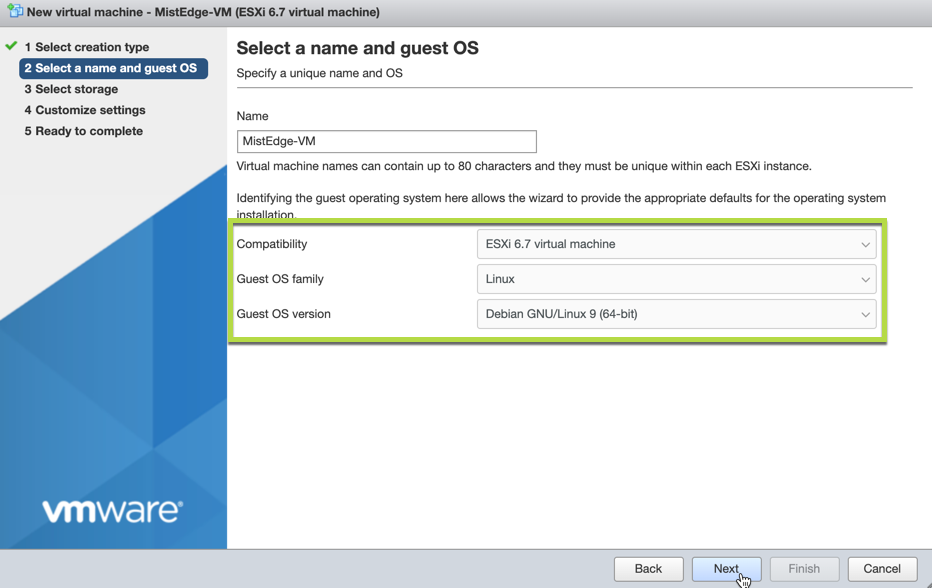
Refer to Virtual MIST EDGE Footprint section for resource guidelines
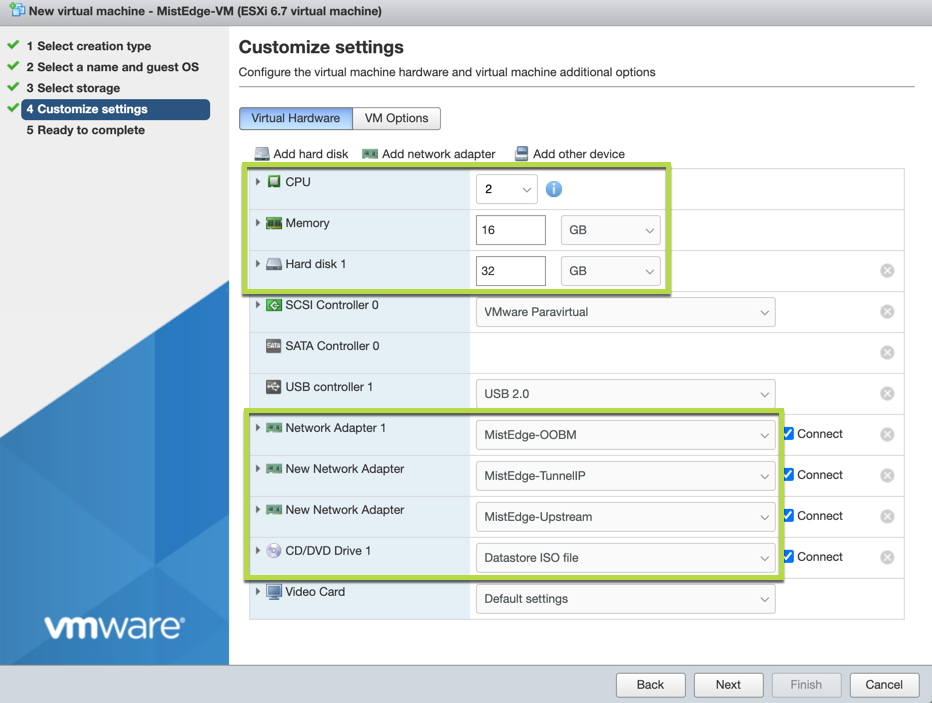

Note: Make sure you add all the network interfaces at this stage. Order of the network interfaces is important.
First – Out of Band management (OOBM)
Second – Tunnel IP interface
Third – Upstream Port.
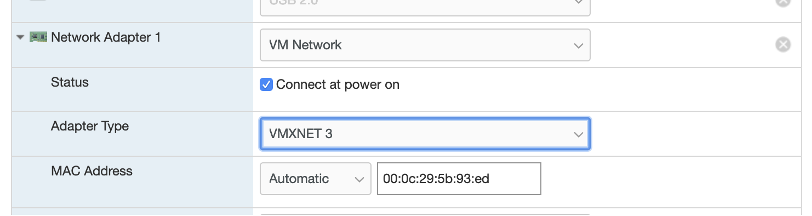
Also make sure to use VMXNET3 adapter type, only VMXNET3 adapter type is supported:
Note: The ‘OOBM IP’ received through DHCP or assigned static while bringing up the Mist Edge VM is different from ‘Tunnel IP’ that is entered in the Mist Edge details on Mist Dashboard (Mist UI).
So, two IP addresses need to be set aside for Mist Edge, one for OOBM and other for Tunnel IP, recommendation is to plan them in different subnets.
Once the VM is created, click Finish and Start it.
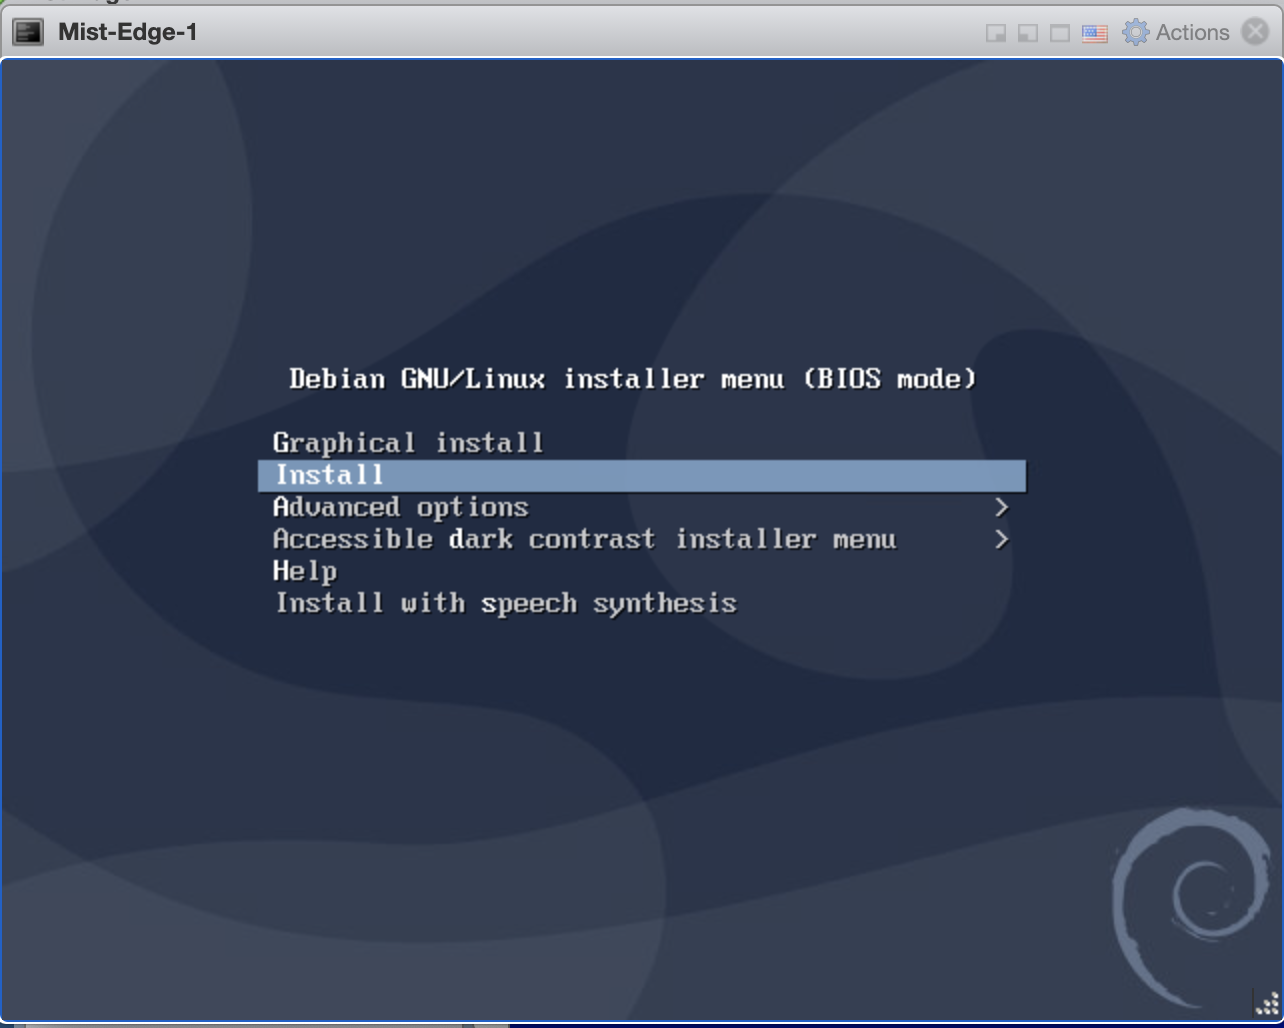
Select ‘Install’ when the Mist Edge VM is powered on.
Please note the default selection on the Mist Edge VM install screen is ‘Graphical install’, change it to ‘Install’ and press Enter key.
After this selection no other input needed, and Mist Edge VM will get installed in a minute or two and will display ‘mxedge login:’ prompt.
Note: Mist Edge VM install will stay 30 seconds to a minute on this screen and request to wait, since it will go ahead by itself. The VM installation is automated, there is no user intervention needed after one selects the Install option.
Request to complete next steps 3 and 4 to login to the Mist Edge VM and claim it to Mist Cloud.
Step 3 – Create a Mist Edge on the Mist Dashboard
Register a new Mist Edge
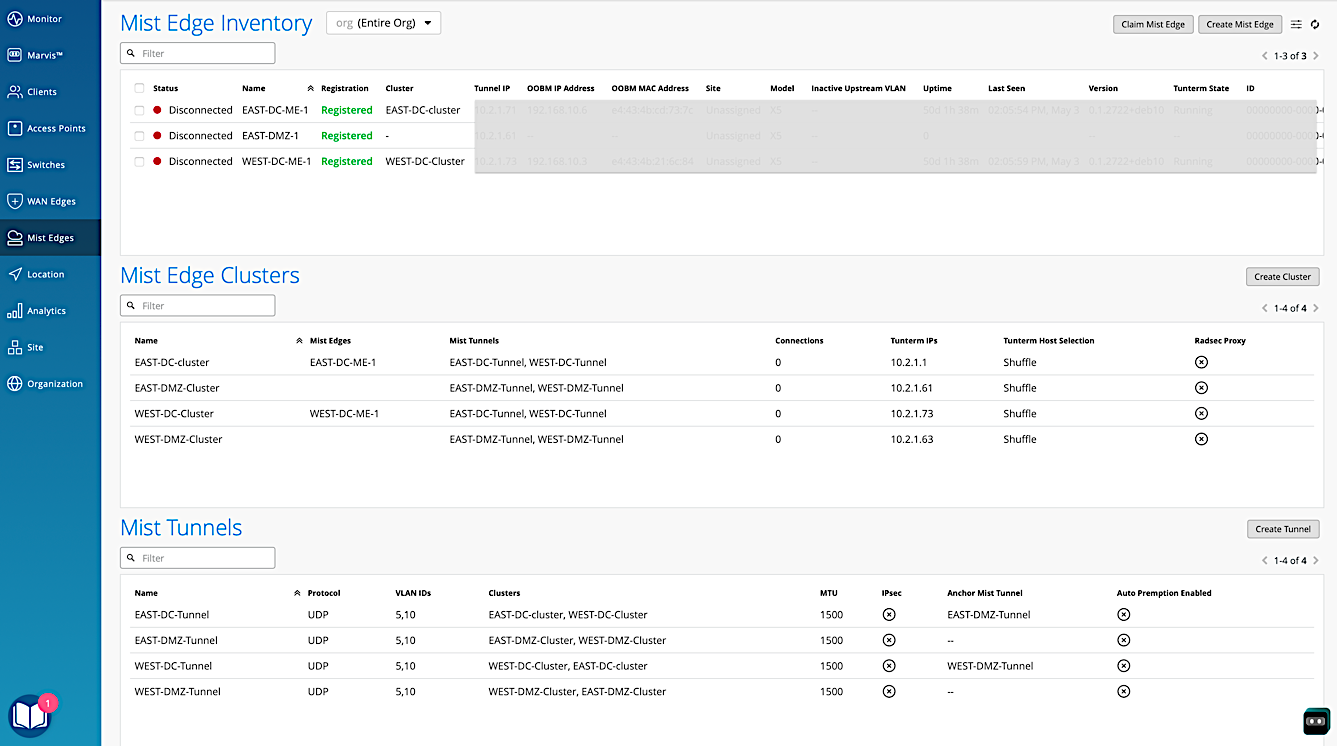
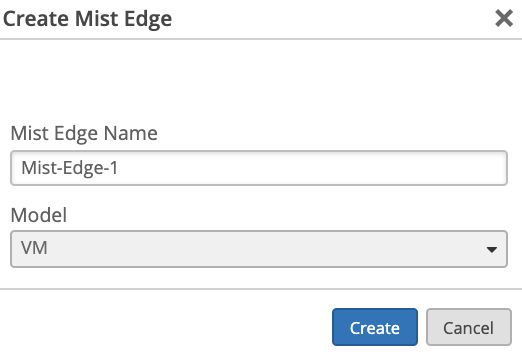
Navigate to Organization > Mist Edges and select create Mist Edge:

Select VM as a model:
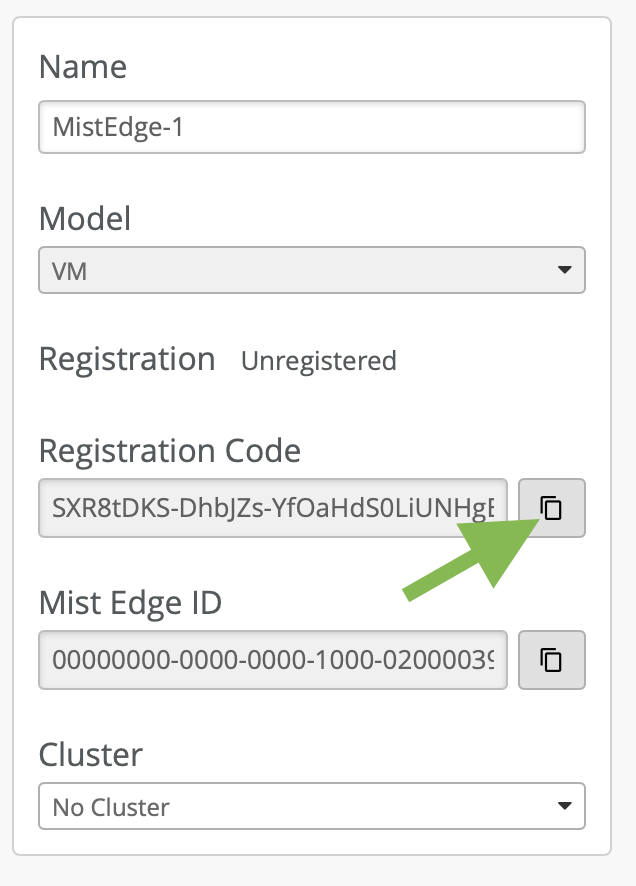
Edit and Configure your Mist Edge:

In the example above Tunnel IP configuration is always a static IP address to which the Access Points will try to set up tunnel connections (either L2TPv3 or IPSEC), which maps to our Tunnel IP Port Group that we created in the earlier step.
Note that Out of Band management IP is by default provided through DHCP. Static OOBM IP assignment configuration is also available from the cloud dashboard as shown in above screenshot with OOBM Port Group and it is different from Tunnel IP.
Copy the Registration Code and Save It:
Step 4 – Create Mist Edge Cluster and assign Mist Edge
[Skip this step for Site level Mist Edges]
Create a Mist Edge Cluster:


Step 5 – Provision your VM Mist Edge
Login to the Mist Edge VM Console
Once your Mist Edge VM boots up for the first time, login to the VM using the following credentials:
Username: mist
Password: Mist@1234
Root (su -) password: mist
Get the current management IP address (it will be obtained via DHCP) by issuing ‘ip a’ command, the Out of Band management interface will be ens192:
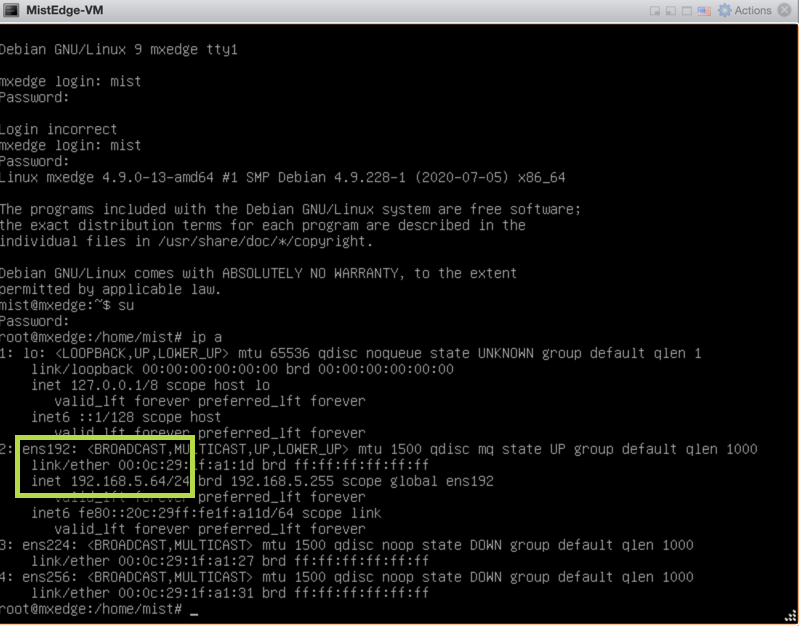
At this point you can SSH into the Mist Edge using the mist user.
ssh mist@<OOBM-IP>, password is Mist@1234
Switch to root by issuing ‘su –’ password is mist.
SSH into the Mist Edge and Bootstrap it:
To bootstrap the mist edge and onboard it to the Mist Cloud, please issue the following commands from CLI:
mist@mxedge:~$ su –
Password: mist
root@mxedge:~# apt-get update
root@mxedge:~# mxagent register --registration-code <paste registration code copied from step 3>
At the end of the process, you should see:
registration finished successfully. (regfile at /var/lib/mxagent/mxagent.reg
Once the above process is complete the Mist Edge will automatically reboot. At this point there is no need to SSH into the Mist Edge anymore. It will pull the config from the Mist Cloud.
Once the Mist Edge is rebooted it will show up on the dashboard in “Connected” state, but with orange icon:

Note: Orange icon means that Mist Edge is online and can communicate to the cloud, but it has no tunnels set up from Access Points yet. Next step will cover this part.
Step 6 – Configure Mist Tunnels
To tunnel VLANs from Mist APs you first need to create a Mist Tunnel.
Navigate to Mist Edges > Mist Tunnels section and Create New:
[For Site level Mist Edges, this configuration is available under Organization > Site Configuration]

Based on our example topology we want to tunnel VLAN 100 and VLAN 200:
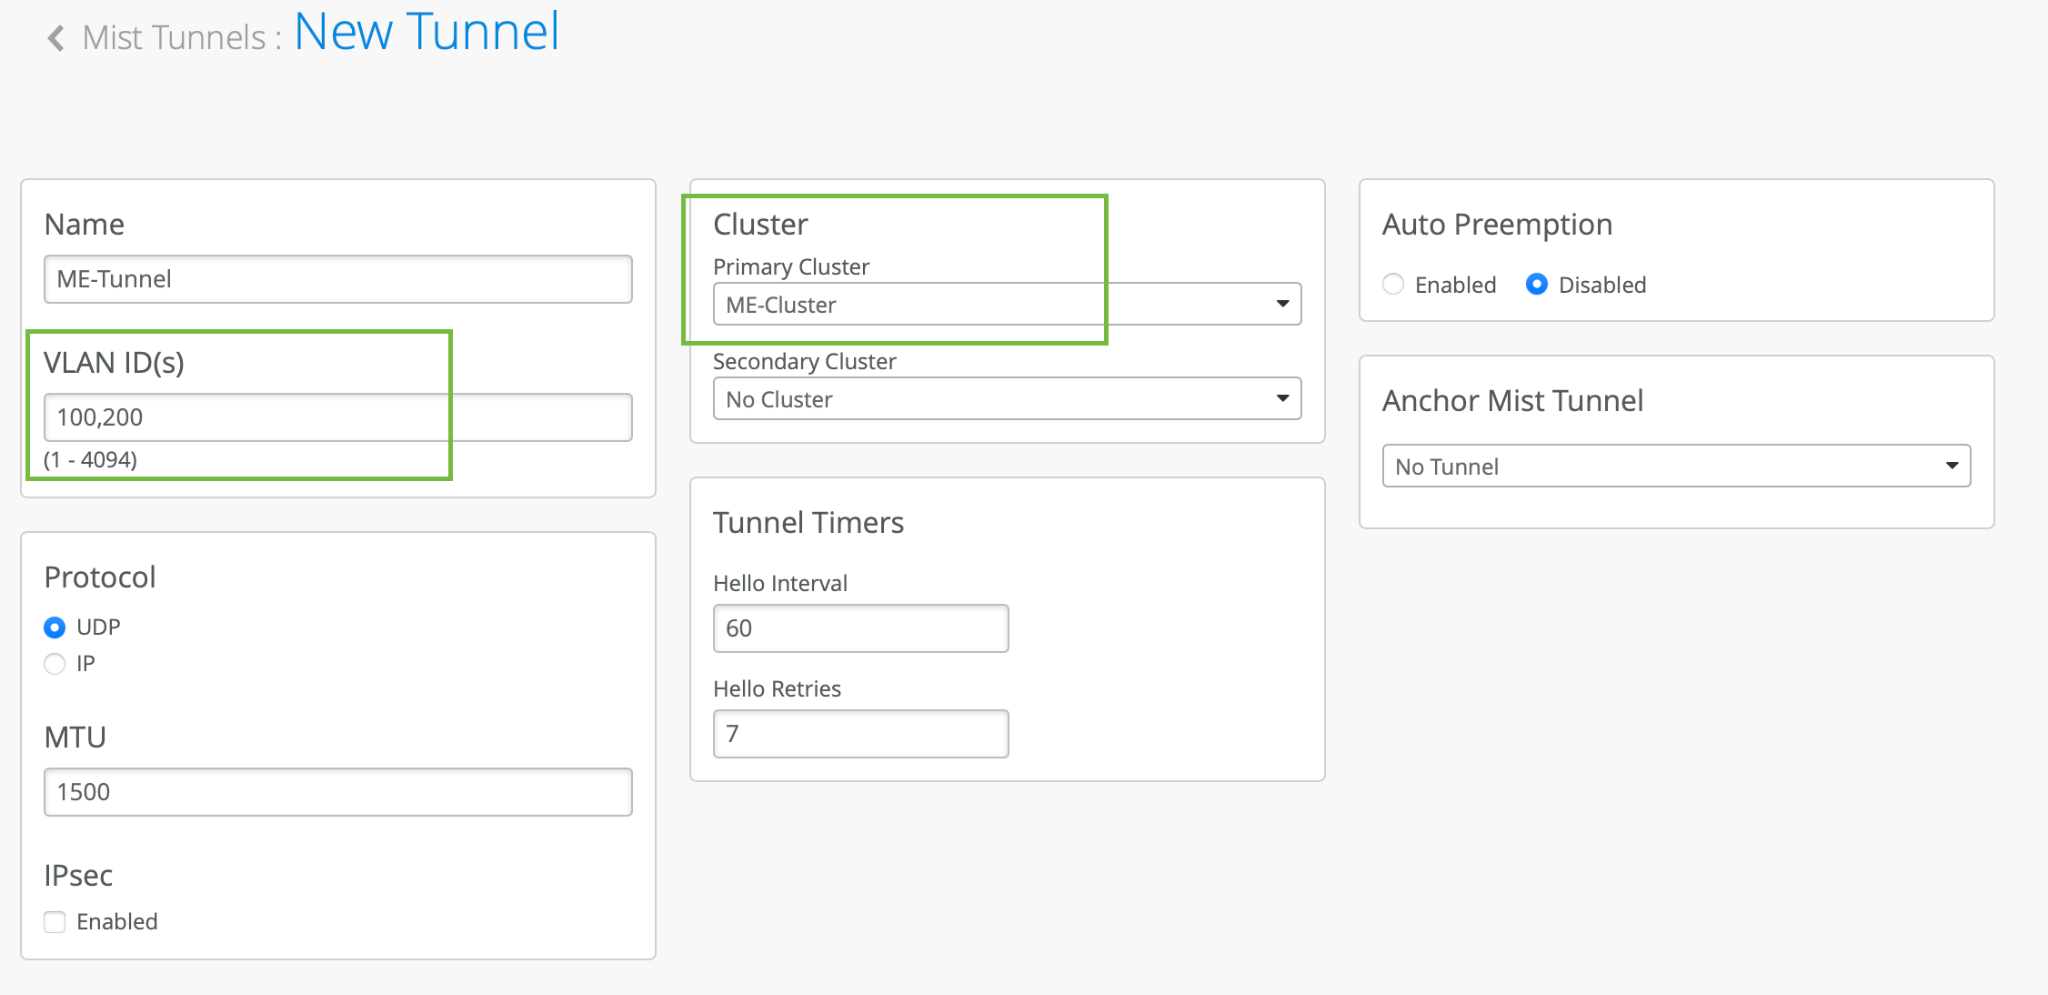
Once the above process is complete, now the tunnel termination service gets downloaded and instantiated on Mist Edge.
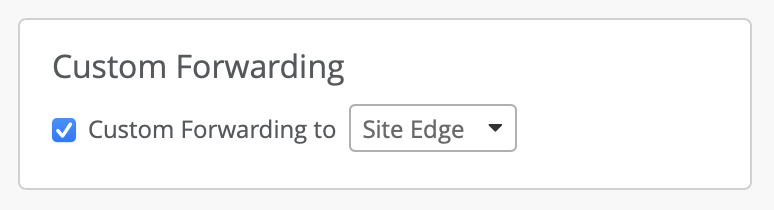
Step 7 – Enable Mist Edge Tunnel on the WLAN
Navigate to Organization > WLAN Templates > <edit existing template> <edit WLAN>:

The important part is to make sure VLAN is configured as Tagged or Dynamic with respective VLAN IDs and enable Custom Forwarding as “Mist” with the Mist Tunnel created in the earlier step. For Site level Mist Edges, select Custom Forwarding to “Site Edge”.
Please refer to Mist Edge Getting started guide and Mist Edge Teleworker guide for more use-cases and configuration options.


