
Simplified Operations
Juniper Apstra Cloud Services integration (Global 01 Instance Only)
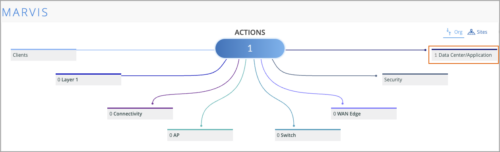
You can now integrate Juniper Apstra Cloud Services with Juniper Mist. Juniper Apstra Cloud Services is a SaaS-based Day 2 observability platform for data centers managed by Apstra. It can receive, process, and perform root cause analysis of networks events from an Apstra-managed data center, thereby enabling network administrators to proactively respond to data center events. It leverages the AIOps capability of Marvis to analyze the events information received from the Apstra-managed data centers.
When integrated with Mist, Juniper Apstra Cloud Services lets you view the total number of data center events in the Data Center/Application category of the Marvis Actions view. Also, you can launch the Juniper Apstra Cloud Services application from the Marvis Actions page and view more detailed information about those data center events by clicking on the Data Center/Application category. This way, network administrators get complete visibility into the operations of the entire enterprise network, comprising the campus, branch, and data center networks.
To integrate the Apstra Cloud Services with Mist, go to the Organization > Settings page of the Mist portal and provide the information such as the Apstra Organization ID and the API token details. For more information see Monitor and Troubleshoot Data Center Events from Mist.
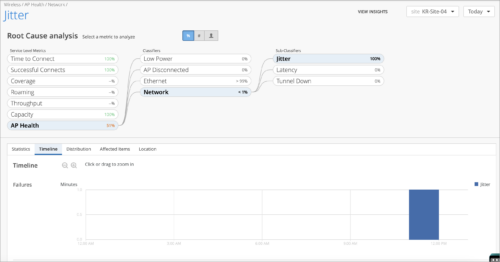
Network classifier for AP Health SLE
We have added the Network classifier to the AP Health SLE metric. This classifier enables you to identify network issues that affect AP health and cause bad user minutes. The Network classifier shows bad user minutes caused by Latency, Jitter, and Tunnel Down events (listed as sub-classifiers).
-
Latency – Indicates an increase of the round trip latency between the AP and the Mist cloud from the site’s learned baseline
-
Jitter – Indicates when there is inconsistent round trip latency between the AP and the Mist cloud
-
Tunnel Down – Tracks when an AP has WLANs configured to tunnel to Mist Edge, but the tunnel is down.
The following image shows the Network classifier page for the AP Health SLE metric.
Machine learning support for improved asset tracking
To improve the accuracy in determining the path loss formula (PLF) for assets in BLE asset tracking, Mist uses machine learning techniques. This enhancement improves the location accuracy for assets. PLF is used by the location engine to predict the likelihood of a device being in its physical location in relationship to an associated customer map.
Access Assurance
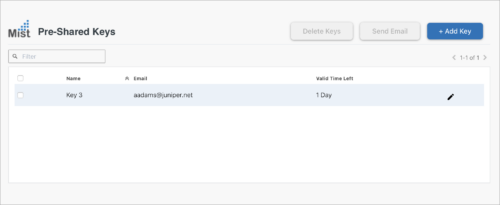
PSK admin portal
In this release, we introduce a new type of PSK portal in Mist – PSK Admin. The PSK Admin portal allows authorized users to login via SSO to create, view, update, and remove PSKs for a selected SSID (applicable only to the WLANs that have PSK with multiple passphrases as security mode). This feature enables any staff members to easily create PSKs for guests and visitors.
To use this feature, you need the standard Access Assurance subscription (S-CLIENT-S).
To create a PSK admin portal, select PSK Admin as the Portal Type from the Add PSK Portal page (Organization > Client Onboarding > Add PSK Portal).

Once a key is created in the portal by the PSK admin, the end user will receive an email with the passphrase. Here is an example of what the Admin PSK portal looks like once the PSK admin logs in.
Wireless Assurance
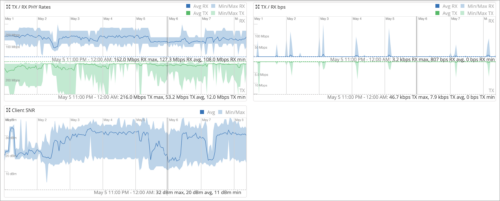
Post connect charts on client SNR and Tx / Rx rates in client Insights
To help users troubleshoot RF issues, we have added the following post connect graphs to Client Insights:
-
TX / RX PHY Rates—Shows the minimum/maximum/average Tx (transmit) and Rx (receive) signals rate (PHY rate) on the selected client. The PHY rate refers to the actual signaling rate at the physical layer of the network interface.
-
TX / RX Bps—Shows the minimum/maximum/average Tx and Rx throughput (in bps) on the selected client over time.
-
Client SNR—The Client SNR (Signal-to-Noise Ratio) graph compares the level of the received signal to the level of background noise and displays the number of dBs by which the signal is above the noise floor. The minimum/maximum/average SNR is displayed over time.
These graphs are available only to those organizations that have an active Marvis for Wireless subscription. To view these charts for a client, click the client name from the Clients section on the Insights page (Monitor > Service Levels – Insights).
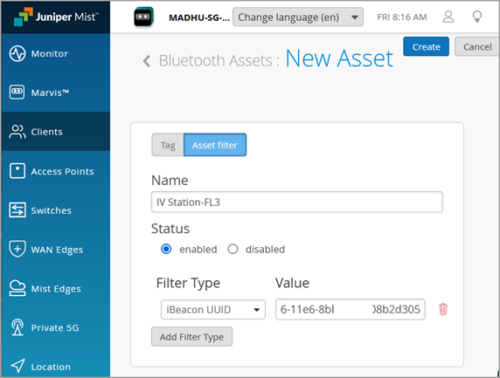
BLE Asset Filtering
In this release, we add asset filtering for Bluetooth low energy (BLE) client tracking and monitoring. You can create filters based on one or more elements found in the BLE beacon of the assets, for example, a common iBeacon value, UUID, or manufacturer name. We support up to six identifiers per filter for granular organization and management in the Mist Client BLE dashboard. If you are already familiar with Asset Visibility in Mist, think of this asset filtering as being like automated labels, only here we are leveraging “labels” that already exist on the asset so you can name, group, and retrieve them easily in the dashboard.
Wired Assurance
DHCP Relay configuration in campus fabric topologies
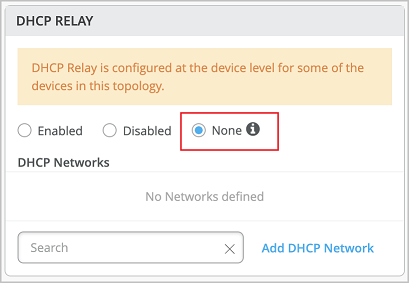
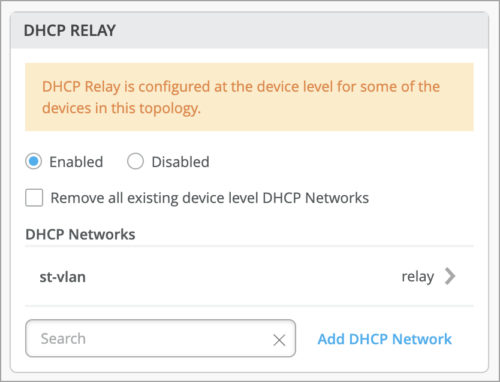
We have extended the DHCP Relay functionality to Campus Fabric topologies. Earlier, network administrators had to enable DHCP Relay on each switch in a fabric from the Switch Details page. With this functionality generally available, you as a network admin can do this once from the DHCP Relay tile on the Network Settings tab of the campus fabric configuration page. The DHCP Relay tile has the following options:
-
Enabled—Configures DHCP relay on all the IRB-enabled devices in campus fabric. This option allows you to enable DHCP Relay on networks that you selected. The network will be populated inside the DHCP Relay tile if it is listed on the Networks tab on the same page.
-
Disabled—Disable DHCP relay on the devices in campus fabric. When you select this option, the DHCP relay is disabled on all the IRB-enabled devices. Note that selecting this option will remove the locally defined DHCP Relay on the Switch Detail page.
-
None—This option is automatically selected when the campus fabric topology has a mix of devices in terms of the DHCP relay configuration; that is, some devices have the DHCP relay enabled, some have it disabled, and some do not have it defined. This option will be visible for all Campus Fabric topologies that have DHCP Relay locally defined on individual switches.
You can remove all the locally defined DHCP Relay networks by selecting Enabled > “Remove all existing device level DHCP Networks“. You can simplify the DHCP Relay deployment by centralizing any configuration change from the campus fabric workflow.
If you enable DHCP relay in a campus fabric configuration, it is enabled on all the IRB-defined devices in the fabric and disabled on the rest of the devices, as listed below.
-
In EVPN Multihoming topologies, DHCP relay is enabled on collapsed core devices and disabled on the rest.
-
In Campus Fabric Core-Distribution (CRB) topologies, DHCP relay is enabled on core devices and disabled on the rest.
-
In Campus Fabric Core-Distribution (ERB), DHCP is enabled on distribution devices and disabled on the rest.
-
In Campus Fabric IP Clos edge topologies, DHCP is enabled on access devices and disabled on the rest.
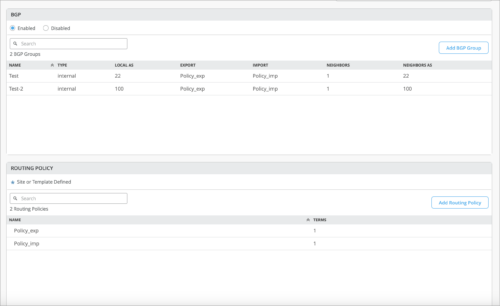
Configuration of routing policies through switch templates
Mist now supports configuration of routing policies through switch templates.
Routing policies are tied to protocols such as BGP or OSPF. A routing policy framework is composed of default rules for each routing protocol. These rules determine which routes the protocol places in the routing table and advertises from the routing table. Configuration of a routing policy involves defining terms, which consist of match conditions and actions to apply to matching routes. These are typically the same across all devices on the same layer (Access or Core).
Previously, you had to configure routing policies per device inside the BGP protocol tab on the switch detail page. With this functionality generally available, you can now configure routing policies through switch templates for the entire organization (Organization > Switch Templates) or for a site (Site > Switch Configuration) and achieve scalability. Routing policies will only be pushed to the switch configuration if it is tied to the BGP Routing Protocol. The Routing policies that are already defined inside the BGP tab of a switch will now appear on the Routing Policy tab.
See also: Basic BGP Routing Policies.
Suggested Junos version for switch upgrades
Mist cloud now suggests Junos versions that users should upgrade switches to. When you upgrade the Junos version on a switch, the upgrade page displays the suggested version for the selected switch, so that you can identify it easily. The page also displays all the applicable versions. The suggested version will appear in both Suggested and All sections on the Upgrade to Version drop-down list on the Upgrade Switch Firmware page. You can upgrade a switch from the Utilities menu on the switch details page (Switch > Switch-Name).
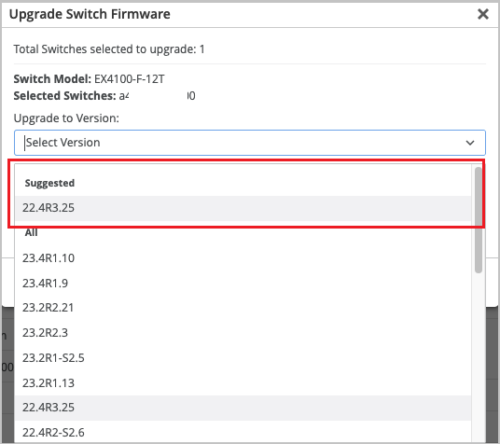
See also: Junos Software Versions – Suggested Releases to Consider and Evaluate.
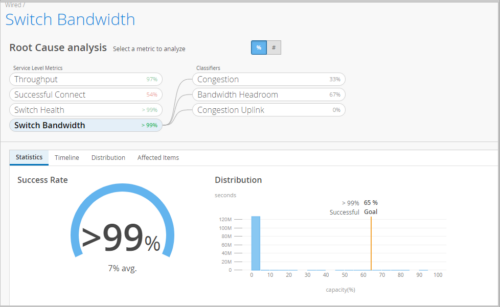
Switch Bandwidth SLE
We have added the Switch Bandwidth SLE to the Wired SLE framework. Juniper Mist measures the available bandwidth on your network based on the queued packets and dropped packets for each configured queue. The ratio between total_DropppedPackets and total_QueuedPackets is used to determine congestion at the interface level. The most dropped queue is also noted in the details for distribution or affected items. This SLE can help you determine if you need more wired bandwidth on your site.
The following are the Switch Bandwidth SLE Classifiers:
-
Congestion—This classifier measures the number of output drops. When packets come into a switch interface, they are placed in an input queue (buffer). When the buffer becomes full, it will start to drop packets (TxDrops). We use a formula that takes into account the following ratios to determine if there is a ‘bad user minute’ due to congestion:
-
TxDrops to TxPackets—Total transmitted bytes dropped to total packets transmitted.
-
Txbps to Link speed—Total bytes transmitted per second to link speed.
-
RxSpeed to Link speed—Total bytes received per second to link speed.
-
-
Bandwidth Headroom—This classifier is triggered if the bandwidth usage exceeds the threshold for this SLE. As an example, if a 1G switch port exceeds 900M of traffic consistently, the SLE will flag this as a means to monitor overutilization of traffic on a switch port
-
Congestion Uplink—The SLE dashboard shows high congestion uplink when:
-
One of the neighbors is a switch or a router (known through LLDP).
-
The port is a Spanning Tree Protocol (STP) root port.
-
The uplink port has a higher number of transmitted and received packets compared to the other ports.
-
Aggregated links are used. Congestion can also be caused by aggregated Ethernet links and module ports.
-
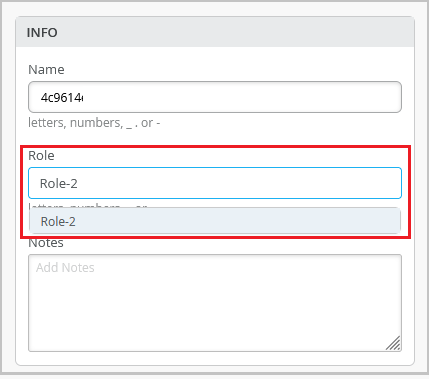
Switch role selection for individual switches
You can select and apply a role to an individual switch from the switch details page (Switches > Switch-Name) or from the switch list (Switches page). This feature ensures that a switch does not inherit a role that does not exist.
The Role drop-down list on Info tab on the switch details page displays the switch roles that exist in the configuration template associated with the selected switch. You can select a role and save the configuration to apply that role to the switch.
On the switch list page, you can select the switch check box and use the Assign Switch Role option on the More menu to apply an available role to the switch.
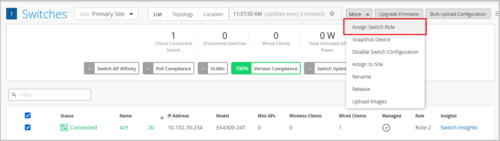
You can create new switch roles as part of Select Switches Configuration rules in a switch template (Organization > Switch Templates or Sites > Switch Configuration).
A switch can have only one role at a time.
Option to sync switch configuration
Sometimes, the configuration push to a switch might fail for various reasons. In such cases, you can use the Sync Configuration option on the Utilities menu on the switch details page (Switches > Switch Name) to resend the configuration to the switch. Previously, when a configuration push to a switch fails, the only option to resend the configuration was to make some update to the configuration and then save the changes. The new feature lets you resend the configuration without making any changes.
The Sync Configuration operation will overwrite any configuration defined on the switch manually through the CLIs.

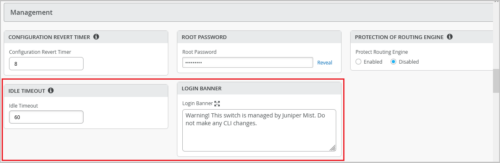
Updates to switch management options
Mist now supports configuration of the following switch management options:
-
Login Banner—This is an information banner displayed to users when they login to the switch. Example: “Warning! This switch is managed by Juniper Mist. Do not make any CLI changes.”
-
Idle Timeout—This is the maximum time for which the remote shell session can stay idle. Users are logged out of the system after the expiry of the idle timeout specified. Supported range: 1 through 60 minutes. This timer is not applicable to Remote Shell Utility via the Mist cloud.
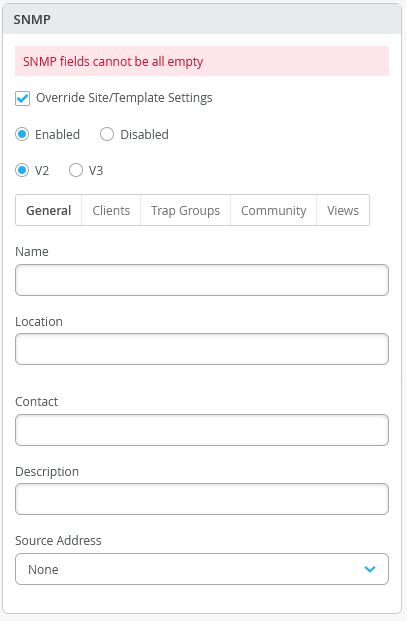
Support for merging the switch-level and template-level SNMP configurations
Mist now supports merging SNMP values configured at the switch-level with the SNMP values that the switch inherited from a site-level or organization-level template. Previously, users could not merge properties such as Location and Description to the globally defined configuration.
This feature is helpful if you want the switch to use some SNMP values from the switch-level configuration and some from the associated site/template. For example, you can use the name and location from the switch-level configuration and everything else from the associated template.
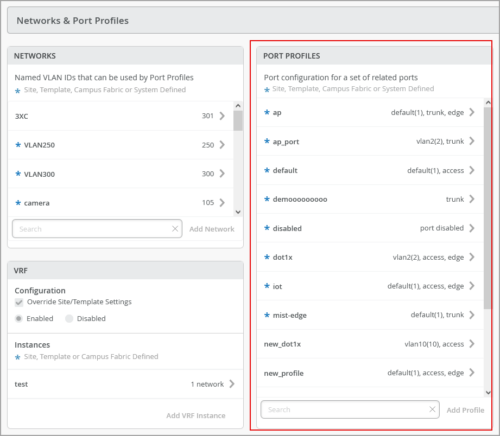
Expanded Port Profile and Port Configuration views
The Port Profiles and Port Configuration tiles on the switch configuration pages now display more line items in the default view. This update aims to increase the visibility of these configuration items and reduce the need to use the scroll feature to view them.
We have expanded the default list view of the following tiles in such a way that these tiles occupy the full length of the configuration section that they belong to on the switch details page or switch template:
-
Port Configuration tile on the switch details page.
-
Port Profiles tile on the switch details page and switch template.
-
Port Config tab in the Select Switches Configuration section on the switch template page.
The following image shows the updated Port Profile tile.
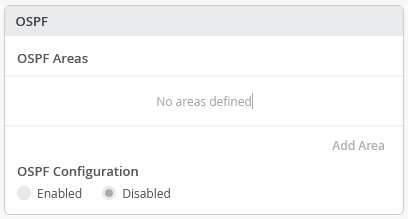
Update to OSPF configuration
The switch details page (Switches > Switch Name) now combines the options to configure OSPF areas and enable OSPF on a single tile named OSPF.
Previously, the option to enable OSPF was part of the Routing tile. And the OSPF Areas configuration had a separate tile.
WAN Assurance
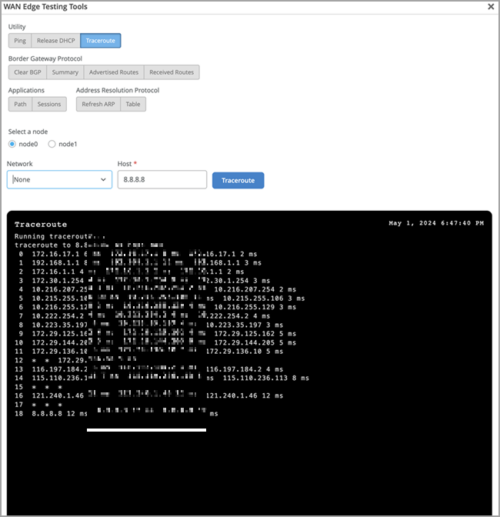
Traceroute support for WAN Edges
On a WAN Edge device, you can use the Traceroute option to view the route that packets take to a specified network and host. Use this option as a debugging tool to locate the points of failure in a network. You can access the Traceroute option from the Utilities menu on the WAN Edges details page (WAN Edges > WAN Edges > WAN Edge Name). To run the test, specify a node, network, and host, and then click Traceroute.
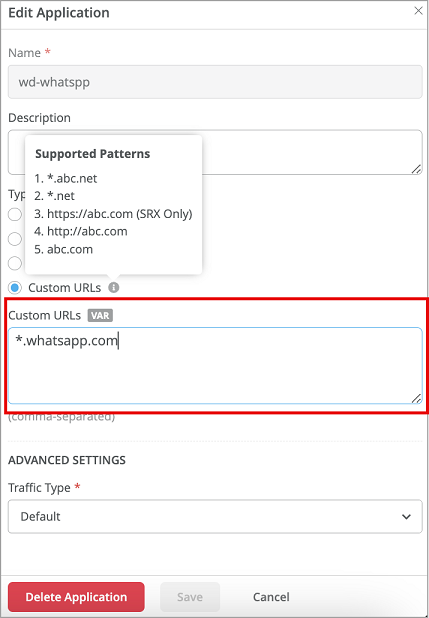
Enhancements to application configuration
We have added the following enhancements to Mist applications (Organization > Applications):
-
Wildcard domains in applications-Mist allows you to create custom URL-based applications. Custom URLs allow you to create wildcard domains list, which can be used to permit or block traffic.
- No session failover (SSR Only)- For applications such as voice, allowing the sessions to failover can cause subpar user experience. In such situations, you can set up these apps with no failover policy, by selecting the None option under the Failover Policy field on the Add Application screen.
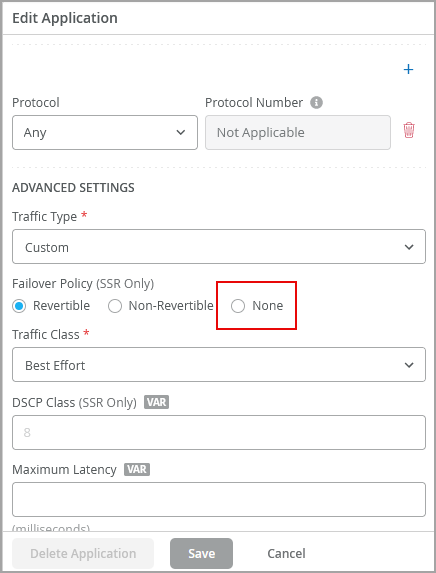
Traffic behavior when failover policy is selected ‘None’: If the WAN1 (the high priority link) on your SSR does not meet SLA, the current sessions will still be present on WAN1 and any new sessions will move to the next link, for example, WAN2. And if WAN1 recovers (meets SLA), the sessions which are on WAN2 will continue on WAN2 and any new sessions will start on WAN1. This behavior applies even if the entire link goes down.
Updated design for LAN configuration
The LAN configuration section on the WAN Edge templates (Organization > WAN Edge Templates) and the device details page (WAN Edges > WAN Edges > WAN-Edge-Name) is now more modular. This change allows for more granular configuration options and overrides. We have separated the following configuration components in the LAN section:
-
IP configuration
-
DHCP configuration
-
Custom VR configuration
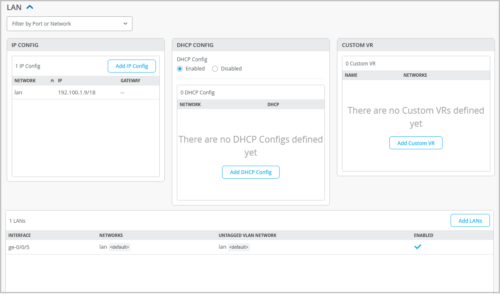
This enhancement adds more flexibility to LAN configuration. For example, you can override each configuration component (such as IP configuration) separately without touching other components.
The LAN Configuration section also provides a filter for you to easily search for configurations per port or network.
Mist Edge
Mist Edge alerts for PSU and power input events
We have added alerts for a few Mist Edge events to the Mist dashboard. You can set up email notifications or webhooks for these alerts if you want to monitor them closely. Here are the Mist Edge events for which we have added alerts:
-
Mist Edge power input cable is disconnected (ME_POWERINPUT_DISCONNECTED)
-
Mist Edge power input cable is connected (ME_POWERINPUT_CONNECTED)
-
Mist Edge power supply unit is unplugged (ME_PSU_UNPLUGGED)
-
Mist Edge power supply unit is plugged (ME_PSU_PLUGGED)
On the Mist portal, you can view all the alerts on the Monitor > Alerts page.
Behavior Changes
Updates to User Privilege Inheritance
We have updated the workflow for resolving user roles (privileges). With this update, the role derived by the user maps to highest granted privilege at the scope (MSP, Org, Site). Today this is already the case for MSP vs Org. The implementation will become consistent for Org vs Site as well. It is the same behavior for local and SSO users.
Therefore, an organization level role could override an explicit site-level role. For example, if a user is granted Super User role at the organization level and Helpdesk role at the site level, the Super User role takes effect at the site level. Note: Configuring multiple org and site privileges is not allowed in the UI, but it is allowed in the API.
User role assignment at the site level
|
|
Role granted at Organization 1 |
Role granted at Site 1 |
Resultant role at Site 1 |
|
Previous Behavior |
Super User |
Helpdesk |
Helpdesk |
|
New Behavior |
Super User |
Helpdesk |
Super User |
Changes to /self API (for MSP users)
The /self API query now fetches only the explicitly granted privileges for an MSP user. It does not fetch the inherited privileges of the user. To view the inherited privileges at the organization level, you need to run the GET API query ‘/msps/:msp_id/orgs’ at the MSP level. To view the inherited privileges at the site level, run the GET API query (/orgs/:org_id/sites) at the organization level.
Feature Deprecation
Webhook topic asset-raw to be deprecated
We will deprecate the webhook topic asset-raw from February 17, 2025 onwards. It will be replaced with a new topic named asset-raw-rssi. See the Webhooks section in https://api.mist.com/api/v1/docs/Site#webhooks.


