Juniper Mist on US GovCloud addresses specific regulatory and compliance requirements of US government agencies at the federal, state, and local level; contractors; educational institutions; and other US customers that run sensitive workloads in the cloud. Currently, this environment is “In-process” on the FedRAMP marketplace for Impact level “Moderate”.
This page lists the Juniper Mist updates released on US GovCloud on April 24, 2024.
Simplified Operations
Mist portal is now multilingual
To help users from multiple languages interact more easily with Mist dashboards, we have added localization support to the Mist portal, making it available in multiple languages. At this point, Mist supports the following languages in addition to English:
- Japanese
- German
- French
- Spanish
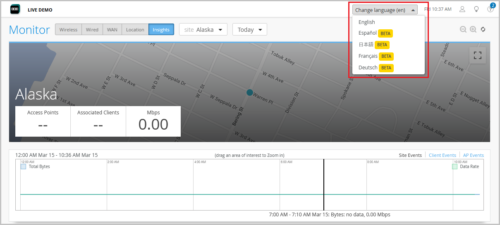
You can change the language from the Language drop-down list on the Mist portal, as shown below:
Super Observer role
We have introduced a Super Observer role that provides users monitor-only access to the entire organization (all sites), including templates and other pages under the Organization tab. This role serves as an extension of the Observer role which has access only to the site-level pages (to the sites to which they have access) and the inventory and campus fabric pages (if the user has access to all sites). The Super Observer role has the same level of API access as an Observer role.
A user with the Super Observer role does not have access to the Administrators page.
The following is an example of the expanded pages Super Observer has read-only access to under the Organization tab. A Super Observer user can see the admin column pages except the Administrator, as well as the pages under the Access, WAN, Wired, and Wireless columns.

In comparison, the following is what an Observer user has read-only access to under the Organization tab.

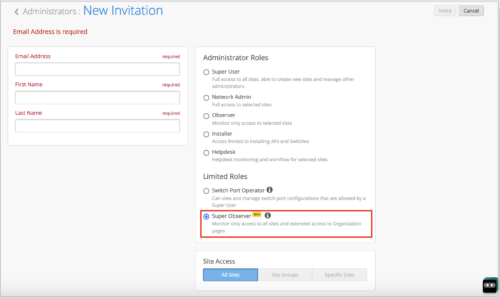
Users with a Super User role can assign the Super Observer role to a user from the New Invitation page (Administrator > Invite Administrators).
Option to seek explicit permission of guest portal users to store their personal data
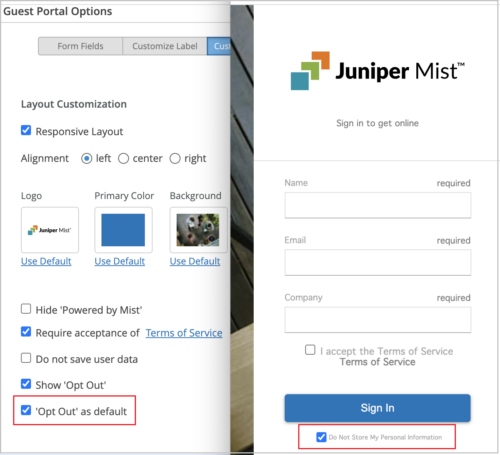
You can now configure the Mist guest portal in such a way that the personal information of users is not stored without their explicit permission. To configure this, select the ‘Opt Out’ as default option on the Customize Layout tab of the custom guest portal configuration page accessed from Mist WLANs. As a result, users accessing the custom guest portal will see the Do not store my personal information option selected by default. They will need to explicitly clear this check box if they want the information they enter into the portal to be stored.
The ‘Opt Out’ as default field is displayed only when you select the Show ‘Opt Out’ field.
In the image below, the ‘Opt Out’ as default field is selected on the custom guest portal configuration page (on the left), and as a result, the Do not store my personal information option is selected by default on the guest portal login page (on the right). Otherwise, if you configure the Show ‘Opt Out’ option, the user must explicitly check Do not store my personal information when submitting the portal information.
Custom forwarding tunnel information on the WLAN list page
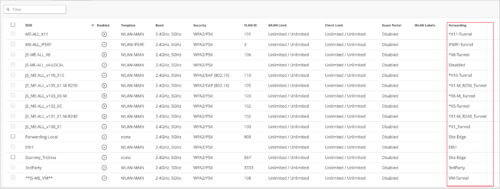
For each tunneled WLAN (where Custom Forwarding is set to a tunnel), you can view the tunnel profile information in the Forwarding column on the WLAN list page (Site > WLANs). You do not have to open each WLAN page to see the tunnel profile mapped to that WLAN.
Client IP addresses in the webhook messages
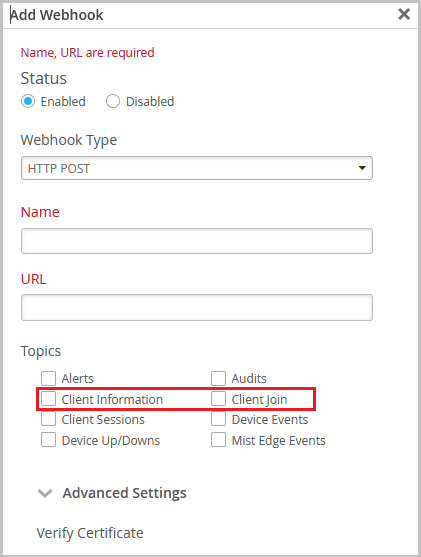
We have enhanced the Client Join webhook topic to include the IP addresses of the client devices that joined your network. We have also added a new Client Information topic to capture any changes in the clients’ IP addresses. You can enable these topics to receive the IP addresses of the clients the moment they join the network. This enhancement involves the following changes:
-
Update to the Client Join topic: We have included the client IP addresses (IPv4 and IPv6) in the Client Join webhook message, in addition to the other client information such as MAC address, RSSI, radio band, and connected AP. The IP address is included only if it is available when the webhook message is sent.
-
New Client Information topic: This is a new webhook topic, triggered when Mist detects a change in the IP address of a client. In the Client Information message, you can see the client MAC address along with the current IP address.
Both topics can be enabled in the webhook configurations at the Org (Organization > Settings) and the Site (Organization > Sites) settings page.
Filtered view of affected items on the Service Level Metrics page
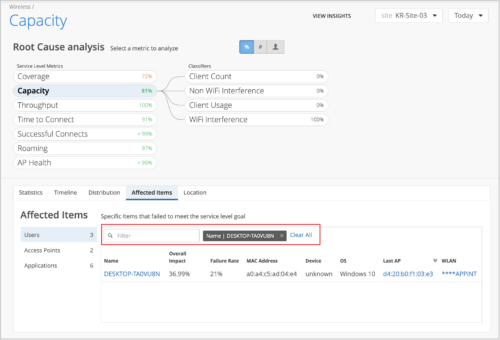
We have added a filter on the Affected Items tab of the Service Level Metrics page to help you view the relevant Affected items under each metric while you perform the root cause analysis of an issue.
Juniper Mist has a new logo
Juniper Mist has a new logo, which has been incorporated throughout the Mist dashboard.

Facebook guest authorization requires custom application
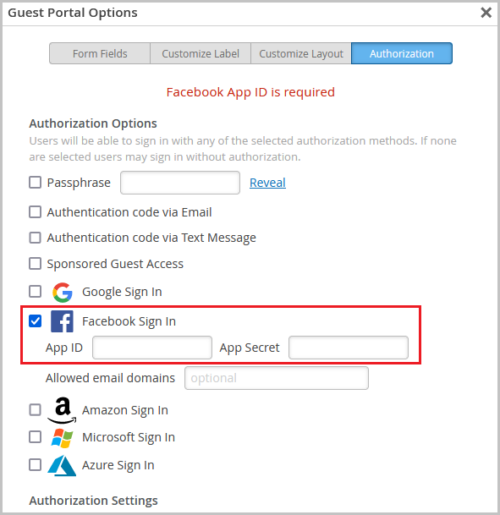
Authorization of a guest user into the Mist cloud using the Facebook Sign In relies on Facebook’s login integration. Over the past year, Facebook has been enforcing more stringent requirements for this service. So, to ensure a successful guest authorization using the Facebook Sign In option, we recommend customers create their own business application with Facebook (for more information, refer to Mist Portal Social Login – Facebook App Creation). We now require newly configured WLANs using Facebook Sign In to use these custom business applications. To do so, specify the Facebook application’s App ID and App Secret in the custom guest portal configuration.
Marvis
Marvis Query Language support for Mist Edges
We have introduced the Marvis Query Language support for Mist Edges. This enhancement enables you to use Marvis Query Language to query Mist Edges and Mist Edge-related events using specific parameters. The following are the Mist Edge-related queries supported by Marvis Query Language:
- List Mist Edges with OOBM IP Address, OOBM MAC Address, Model, Site, or Version.
- List Mist Edge Events with Site, Mist Edge, or Mist Edge Event Type.
- List APs with Mist Edge name/ID and MX Tunnel Status down or up.
- Count Mist Edges with OOBM IP Address, OOBM MAC Address, Model, Site, or Version.
- Count Mist Edge Events with Site, Mist Edge, or Mist Edge Event Type.
- Count APs with Mist Edge name/ID.
- Rank Mist Edges by Tunnel Count.
- Rank Mist Edges by Mist Edge Events Count.
- Rank Mist Edge Event Types by Mist Edge Events Count.
- RANK Mist Edge Version BY Mist Edge Count.
- RANK Mist Edge Model BY Mist Edge Count.
To start the query process, click the Ask a Question link in the upper-right corner of the Marvis page.
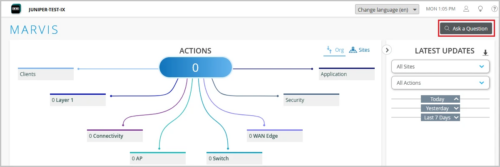
The following image shows how to how to build a Mist Edge query with Marvis Query Language.

Marvis Minis is now live on Mist
We are excited to announce Marvis Minis, a network digital twin that helps proactively identify network issues. In this first release, Marvis Minis performs user connection tests on Access Points (APs) on user VLANs to instantly validate connectivity and application reachability issues on your network. It runs tests even when there are no actual end-user devices on the network, thereby enabling you to detect and resolve network issues before they impact users. It augments the already rich set of SLE data provided by Mist.
Marvis Minis is currently supported on non-FIPS AP 0.14.29313.
Marvis Minis requires all APs in a site to run firmware version 0.14.29313 or newer. Once all APs in a site are upgraded to 0.14.29313 or newer firmware, automatic Marvis Minis tests will begin approximately an hour after upgrading.
By default, Marvis Minis runs on a few APs based on the scope which it automatically learned. Therefore, Minis does not cause any additional stress on the network services. However, it can auto-expand the scope of the operation to other APs and switches to determine whether the failure is site-wide, or specific to switches or APs.
Marvis Minis runs every hour automatically. You, as an admin user, can also run on-demand tests manually on any site at any time from the Marvis Minis page (Marvis > Marvis Minis). To run the test, you must select a site from the Sites tab on the page.
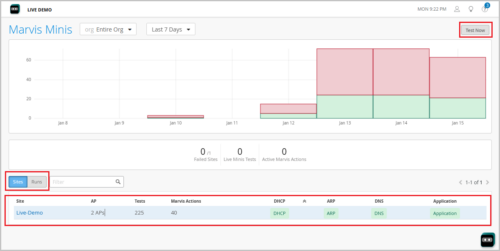
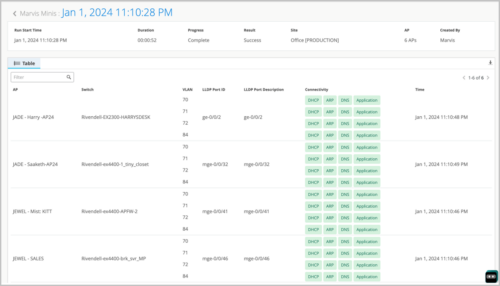
The Runs tab on the Marvis Minis page lists all the Marvis-Minis-run tests. You can open any test to view the details, as shown below.
Data from Marvis Minis is fed into Marvis Actions as an additional source of insight. You can view it under the Marvis Action ‘Connectivity’. You can also use Marvis Query Language to filter Marvis Minis-reported connectivity test failures.
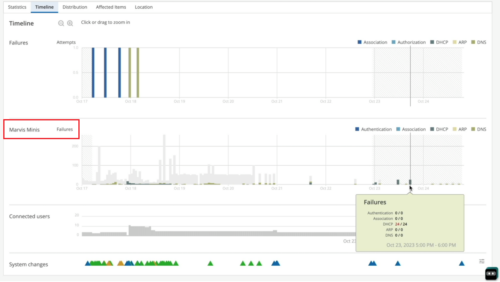
The Marvis Minis-reported data is also displayed on the Timeline view of Successful Connect SLE, as shown below.
Minis is enabled by default after upgrading to firmware version 0.14.29313 or newer. You can disable Marvis Minis per site from the site settings (Organization > Site Configuration) or for the entire organization from the organization settings (Organization > Settings). You can exclude VLANs from testing from the same site or organization level configuration.
Marvis Minis does not require a separate license. Minis is activated with an active Marvis for Wireless subscription.
API support for troubleshooting sites, devices, and clients
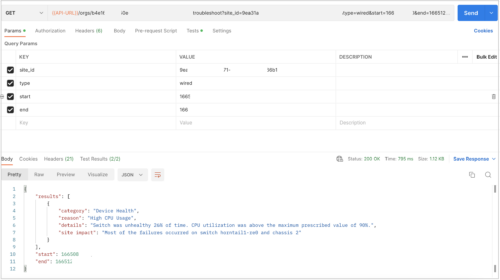
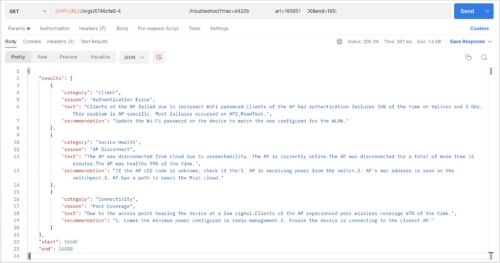
We have introduced Marvis APIs that provide you a way to query Marvis to troubleshoot sites and devices. The devices include wired and wireless clients, access points (APs), switches, and WAN Edge devices. The API query fetches a text-based response containing the problem category, reason, description, and recommendation (if applicable).
You can troubleshoot the devices by using the device MAC addresses, and the sites by using the site IDs and network types (optional). The network types include wireless (default), wired, and WAN.
To use this feature, you must have the following:
- Marvis subscription at the organization-level (see Subscriptions for Marvis).
- Organization-level access (to all sites).
The following image shows APIs for troubleshooting a site (wired network):
The following image shows APIs for troubleshooting devices or clients:
See the API documentation here: https://api.mist.com/api/v1/docs/Org#troubleshoot
Note: To access the above URL, you need to log in to the Global 01 environment. You can access the API documentation from the help (?) menu on the Mist portal (the organization UI).
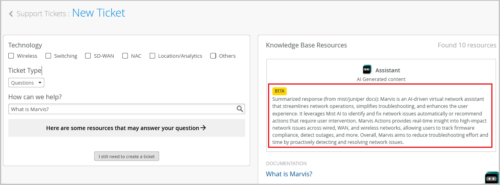
Instant, summarized response to your support questions
The Support Ticket page displays an instant, summarized response, in addition to the relevant documentation links, to your support questions. You can review this AI-generated response to see if it answers your question before opening any documentation pages. You can access the Support Ticket page from the help (?) menu.
Wireless Assurance
Support for approving wildcard SSIDs
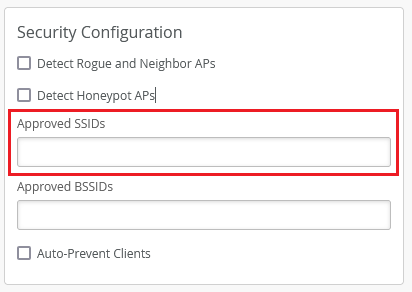
The Approved SSID field under the Security Configuration in site settings (Organization > Site Configuration) is used to exclude specified SSIDs from rogue and honeypot detection. This field now supports the use of wildcards and partial match. For instance, to approve an SSID named DIRECT-roku-755-22DDFF, you can include only the text direct* in the Approved list so that all SSIDs starting with the word direct get approved. This feature is useful when there may be many SSIDs with the same SSID name structure, for example, printers or TVs with Wi-Fi Direct. Partial BSSID matching is already supported in Approved BSSIDs, for example (“cc-73-*”, “cc:82:*”).
CenTrak updates
We have updated the AP firmware version requirement for CenTrak support to 0.10.24623. This update will result in quicker reporting of data from CenTrak tags.
We have also made updates to ensure that CenTrak data and connected clients are reported on one map. Previously, unconnected clients and CenTrak data were being reported on multiple maps at the same time.
CenTrak listening can be enabled at an individual AP level, or in bulk using Device Profiles. When enabled, Mist APs listen for CenTrak tags and the Mist Cloud relays the tag data, including calculated x,y location coordinates to the CenTrak servers in real-time over webhooks.
Wired Assurance
Dedicated management VRF instance for switches (out of band)
You can enable a dedicated management virtual routing and forwarding (VRF) instance on switches. Enabling this feature confines the management interface (em0/me0/fxp0,vme) to a non-default VRF instance. This feature works for standalone devices and Virtual Chassis systems running Junos OS version 21.4 or later. With the dedicated management VRF instance in place, management traffic does not have to share a routing table with other control traffic or protocol traffic.
By default, out-of-band management traffic is not clearly separated from in-band protocol control traffic in switches. All traffic passes through the default routing instance and shares the default inet.0 routing table.
You can configure dedicated management VRF from the IP Config (OOB) tab in the Select Switches Configuration section on the organization-level or site-level switch templates (Organization > Switch Templates or Sites > Switch Configuration). You can also do this from the switch details page (Switches > Switch Name).

In-band management network at the switch template level
The switch templates now provide the option to configure networks for in-band management traffic. You can do this from the IP Config tab in the Select Switches Configuration section on the organization-level or site-level switch templates (Organization > Switch Templates or Sites > Switch Configuration). This configuration option is already available at the switch level (Switches > Switch Name).

Update to Loopback per-VRF subnet requirement
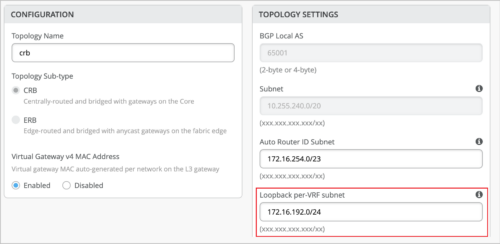
You can now use a /19 or smaller subnet in the Loopback per-VRF subnet field, which is part of Juniper Mist campus fabric configuration (Core-Distribution and IP Clos topologies). Previously only the /19 subnet was allowed. Also, for new topologies, we have changed the default Loopback per-VRF subnet value from 172.16.192.0/19 to 172.16.192.0/24. This does not apply to the existing topologies. Mist uses this subnet to automatically configure loopback interfaces (lo0.x) per VRF instance that is used for services such as DHCP relay.
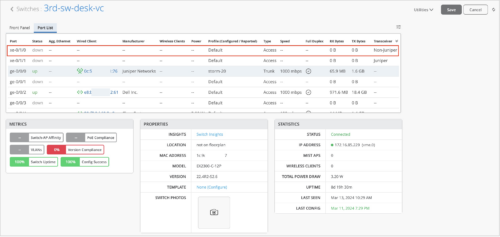
Transceiver column in Port List
The Port List on the switch details page now indicates whether the transceivers used in the switch are Juniper-supported or not. A new column named Transceiver shows this information. This column has the following values:
- Juniper: Indicates that the transceiver is supported by Juniper.
- Non-Juniper: Indicates that the transceiver is not supported by Juniper.
Port List displays authentication method and dynamic port configuration status
We have added the following columns to the Port List tab on the switch details page (Switches > Switch Name):
- Dynamic Port Configuration: Shows the dynamic port configuration status to help you determine if a switch port is enabled with a dynamic port profile. Dynamic port profiles enable you to configure rules for dynamically assigning port profiles to an interface.
- Authentication: Shows the authentication method configured on the switch port for access control. This column could display values such as Dot1x, Dot1x/MAB, and MAB.
You can also view the dynamic port configuration status and the authentication information on the port window that appears when you hover over a port on the Front Panel tab.
If you do not see these columns on the port list, click the hamburger menu on the right and then select the check boxes representing these columns to display them.

Support for configuring slow interval for LACP packet transmission
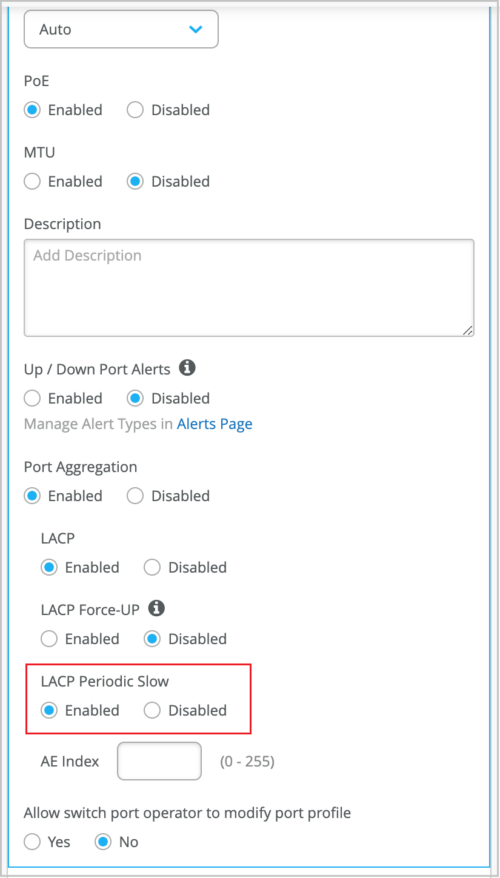
For aggregated Ethernet (AE) interfaces, you can set the slow interval (LACP Periodic Slow) for periodic transmission of LACP packets. If you configure the LACP Periodic Slow option on an AE interface, the LACP packets are transmitted every 30 seconds. By default, the interval is set to fast in which the packets are transmitted every second. You can enable the slow interval from the Port Config tab in the Select Switches Configuration section of the switch template (at the organization level or site level) or from the Port Configuration section on the device-level switch configuration page (Switches > Switch Name). The option to configure the LACP Periodic Slow interval is available only if you enable LACP on the port.
Support for dot1x authentication in multiple supplicant mode
You can configure a switch port with dot1x authentication in multiple supplicant mode. In this mode, multiple end-devices can connect to the port. And each end-device is authenticated individually. To configure multiple supplicant mode, select the Allow Multiple Supplicant check box on the port profile in the switch template (at the organization level or site level) or in the device-level switch configuration page (Switches > Switch Name). This option is available only if you select the ‘Use dot1x authentication’ option. For this configuration to take effect, you must assign the port profile to a switch port.

Software version mismatch warning for Virtual Chassis member switches
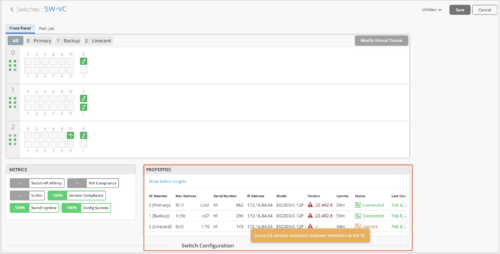
The switch details page (Switches > Switch Name) for a Virtual Chassis shows a warning message for each member switch running a software version that is different from the software version on the other members in the Virtual Chassis. In case of a version mismatch, the Version column in the Properties section of the switch details page displays a warning icon. To view the warning message, hover over the warning icon. The status of the members with a software version mismatch is shown as inactive.
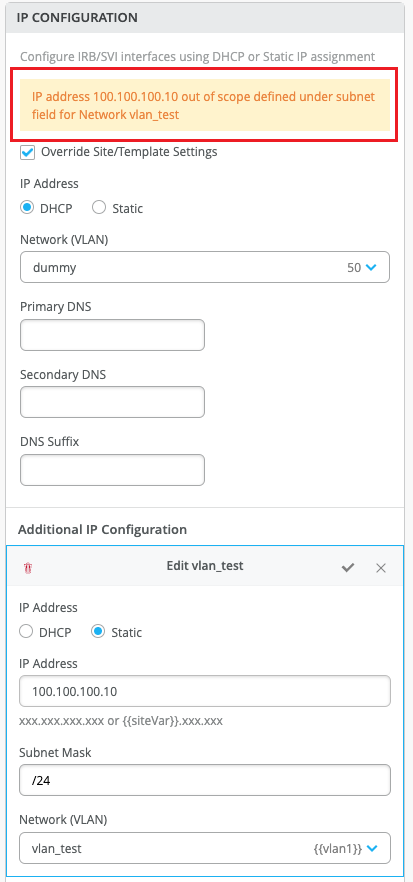
Warning when additional IP address falls outside the network range associated
If the IP address specified in the Additional IP Configuration section under IP Configuration on a switch details page (Switches > Switch Name) does not fall within the scope of the subnet configured in the associated network (VLAN), the IP Configuration window displays a warning message to indicate the mismatch.
Support for overriding port configuration through bulk port edit
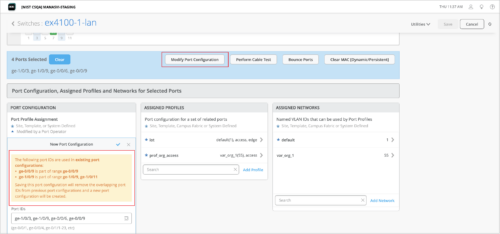
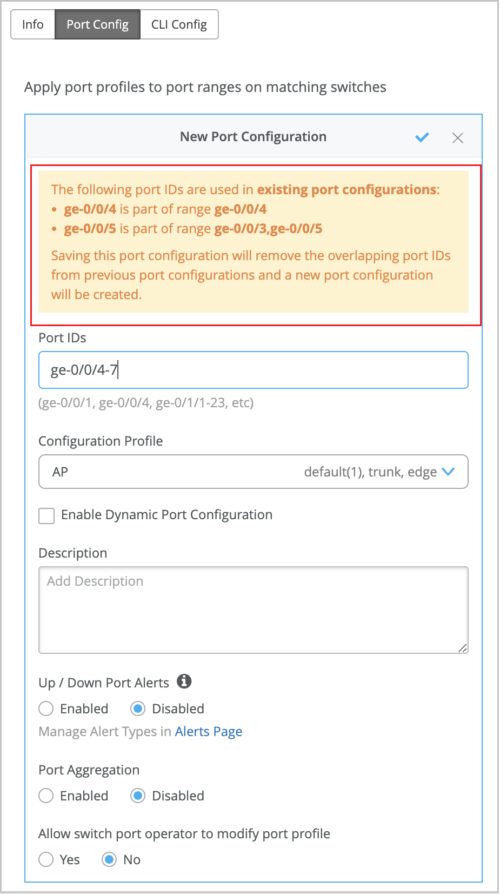
You can use the bulk port configuration option on the switch details page to override any existing port configuration on a switch. To do that, select the ports to be configured from the Front Panel on the switch details page, and click Modify Port Configuration. In case the selected ports are already part of an existing port range configuration, a warning message indicating the same is displayed. When you save the new configuration, it will replace the existing configuration for the selected ports. Previously, you had to manually remove any port configuration overlap before you carry out a bulk port edit.
Here is how a warning that indicates a port configuration overlap is displayed when you bulk edit ports:
You can also see the port configuration overlap warning (if there is an overlap) when you try to edit the configuration from the Port Config tab of a switch template (organization or site level) or from the PORT CONFIGURATION tile on the switch details page. The following sample image shows the Port Config tab on the switch template:
Updates to root password configuration
As a Super User, you can configure your Junos root password from the switch template (at the site or organization level) or from the switch details page. Previously, this configuration was available only on the site configuration page (Organization > Site Configuration). The root password you already defined on the Organization > Site Configuration page is now available on the site-level template (Site > Switch Configuration) and is inherited by the associated devices.
If you are not a Super User, you can only see the password (if available) as an encrypted text. The Root Password field is optional.
With this release, you can configure root password from the following pages (in addition to the site configuration page):
-
Organization-level switch templates (Organization > Switch Templates).
-
Site-level switch templates (Site > Switch Configuration).
-
Switch details page (Switches > Switch Name).

Option to configure AP threshold for the Switch-AP Affinity metric
You can configure a threshold value for the number of APs per switch to be considered in the Switch-AP Affinity metric calculation. The Switch-AP Affinity metric is one of the compliance parameters used to track the performance of switches. This metric shows the weighted percentage of the switches for which the number of APs connected exceeds the threshold configured. By default, the Switch-AP Affinity threshold is set to 12 APs per switch.
To configure the AP threshold, click the Switch-AP Affinity indicator, and then click the hamburger icon on the right of the Switch-AP Affinity section.

WAN Assurance
OSPF support for WAN Edge devices
Mist supports configuration of Open Shortest Path First (OSPF) on WAN Edge devices. OSPF is a link-state routing protocol used to determine the best path for forwarding IP packets within an IP network. OSPF divides a network into areas to improve scalability and control the flow of routing information.
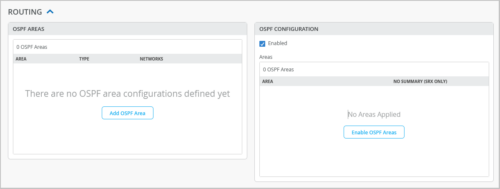
You can configure OSPF from the Routing section on WAN Edge templates (Organization > WAN Edge Templates), hub profiles (Organization > Hub Profiles), or the WAN Edge device configuration page (WAN Edges > WAN Edges > WAN Edge Name).
OSPF configuration involves the following two steps:
- Defining an OSPF area from the OSPF AREAS tile.
- Applying that to the WAN Edge device from the OSPF CONFIGURATION tile.
For more information about OSPF areas, see this Junos documentation: Configuring OSPF Areas.
VRF route leaking
Mist WAN Edge devices support VRF route leaking, a feature which enables you to share route information across VRF instances. This feature allows you to share traffic across VRF instances within a device or between multiple devices.
To configure VRF route leaking on an SSR device:
- On the SSR device, create a routing policy for the route (prefix) to be shared and include the target VRF in it. Typically, this policy is associated with a hub (in a hub-to-spoke use case). You can do this from WAN Edge templates, hub profiles, or individual WAN Edge devices.
- On the hub device, configure an application policy with the route (the prefix included in the routing policy) specified in the destination field. Note that the spoke device requires an application policy only if there is no appropriate BGP policy between the spoke and the switch connected to it.
For a WAN Edge SRX device, route leaking is part of the Mist intent configuration model and can be enabled through application policies.
Support for testing your WAN link speed (SSR)
Mist provides an option to test the speed of WAN links on the Session Smart Routers (SSRs) managed by Mist. This feature supports specific use cases. For example, you can test the speed of circuits installed to a branch office with an SSR at the edge of the customer premises. You can carry out tasks such as the following:
- New link qualification
- On-demand speed tests when a low link speed is suspected to be causing link issues
You can run speed test from the SSR WAN Edge details page (WAN Edges > WAN Edges > WAN Edge Name) and then select the WAN port from the port panel. Results for past on-demand or scheduled speed test runs will be available on the WAN Edge details page.
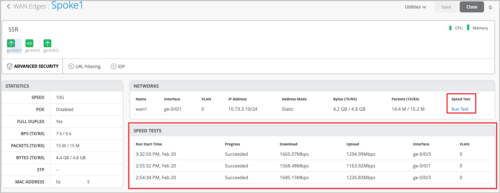
Before running the test, ensure that the WAN link has connectivity to the Internet, where the speed test infrastructure can be reached. For SSR clusters, the speed test can be run only on the active WAN link. The speed test feature does not require any firmware version update for your SSR.
Support for disabling WAN Edge ports
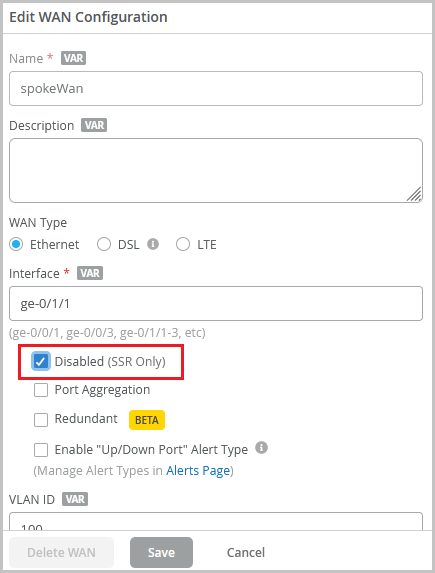
If you want to disable a LAN port or WAN port on a WAN Edge device for any reason, you can do so from the WAN Edge template (Organization > WAN Edge Templates) or from the WAN Edge configuration page (WAN Edges > WAN Edges > WAN Edge Name). To administratively disable a WAN Edge device port, select the Disabled check box under the specified interface on the LAN or WAN configuration section.
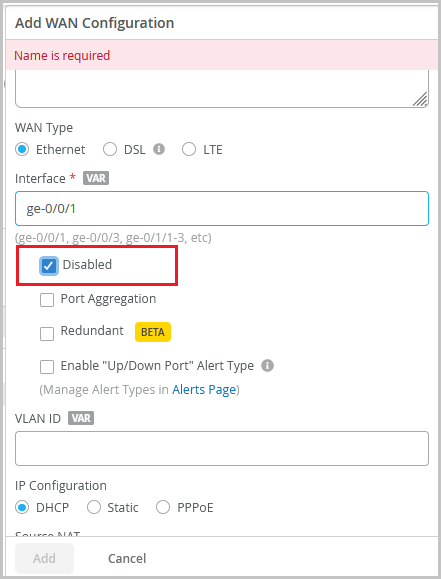
This option is part of interface configuration. If you use this option to disable an aggregated Ethernet (AE) interface or redundant Ethernet (reth) interface, all member links are disabled.
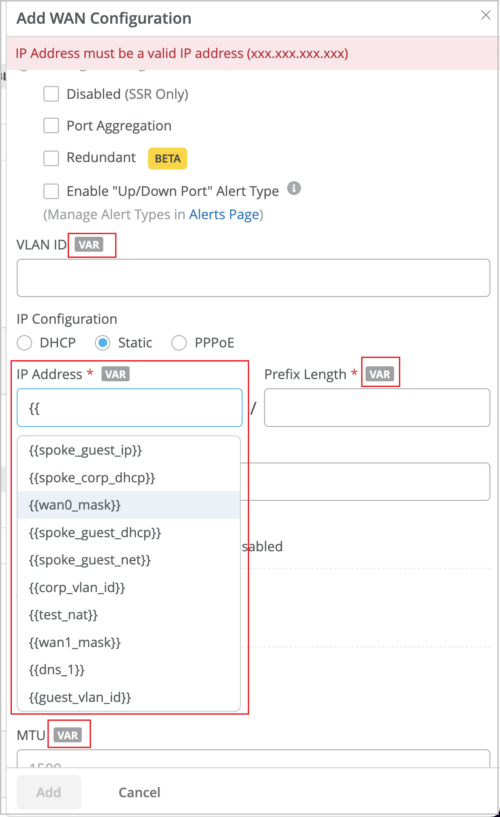
Hint text for fields that support site variables
The WAN Edge configuration fields that support site variables now come with a VAR label. This label helps you quickly identify the fields which can be configured using site variables. Also, the fields with this label will display the matching variables (if configured) as you start typing a specific variable in it. To know more about site variables, see Configure Site Variables.
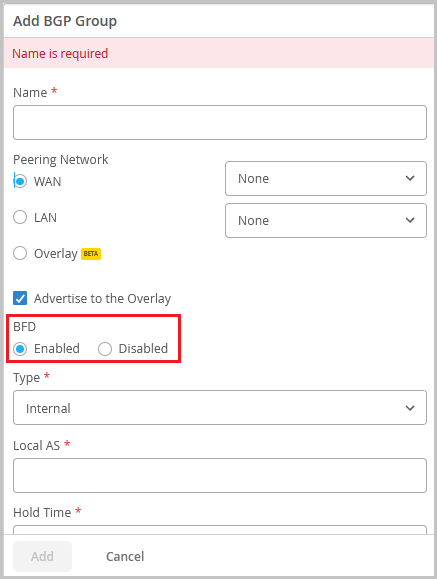
BFD configuration support for BGP sessions
You can enable or disable Bidirectional Forwarding Detection (BFD) for the BGP sessions on WAN Edge devices.
The BFD protocol is a simple hello mechanism that detects failures in a network. Hello packets are sent at a specified, regular interval. A neighbor failure is detected when the routing device stops receiving a reply after a specified interval. The failure detection timers for BFD have shorter time limits than default failure detection mechanisms for BGP, so they provide faster detection.
You can enable or disable BFD from the Add BGP Group section on the WAN Edge template (Organization > WAN Edge Templates) or from the WAN Edge configuration page (WAN Edges > WAN Edges > WAN Edge Name).
Support for disabling BGP neighbors
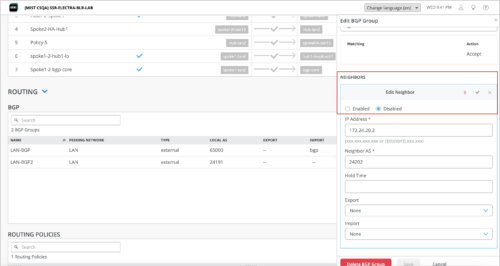
If you want to disable BGP neighbors on your WAN Edges for any reason, you can do so from the WAN Edge template (Organization > WAN Edge Templates) or from the WAN Edge configuration page (WAN Edges > WAN Edges > WAN Edge Name). To administratively disable a BGP neighbor, select the Disabled check box in the Edit Neighbor section on the Add or Edit BGP Group page.
Support for disabling WAN Edge ports (SSR)
If you want to disable a LAN port or WAN port on an SSR Series device for any reason, you can do so from the WAN Edge template (Organization > WAN Edge Templates) or from the WAN Edge configuration page (WAN Edges > WAN Edges > WAN Edge Name). To administratively disable an SSR device port, select the Disabled check box under the specified interface on the LAN or WAN configuration page.
Support for configuring custom DSCP values (SSR)
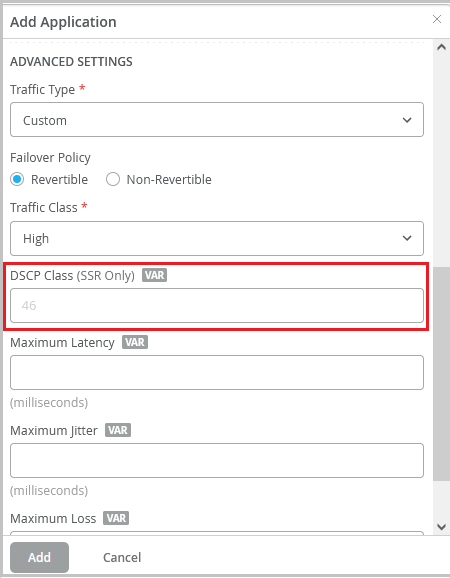
We have simplified the configuration of Differentiated Services Code Point (DSCP) values for SSR Series devices. You can now specify custom DSCP Class values (ranging from 0 to 63) per traffic type for each application. Previously you had to choose from a set of pre-built values (statically mapped to each traffic type) from the DSCP Class drop-down list.
DSCP helps you classify and manage network traffic to provide quality of service (QoS) in modern Layer 3 IP networks. It uses the 6-bit Differentiated Services (DS) field in the IP header to classify packets.
You can configure DSCP Class values from the Add Application page. When you select a traffic class (Best Effort, High, Medium, or Low), the applicable default DSCP Class value is displayed as a help text. You can choose to override it.
Support for SRX1600
Juniper Mist supports onboarding, management, and troubleshooting of the SRX1600 Firewall for the secure router use case. The SRX1600 is ideal for small-medium enterprise edge, campus edge, data center edge, and secure VPN router deployments for distributed enterprise use cases.
To onboard an SRX1600, use the Adopt WAN Edges workflow on the Inventory page (Organization > Inventory > WAN Edges). This device does not support the Claim WAN Edges workflow.
PCAP support for SRX
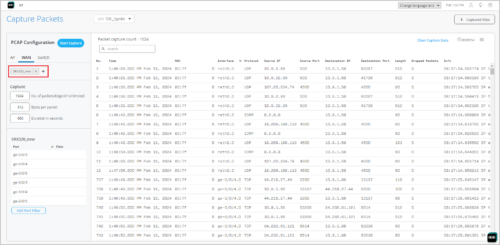
Mist provides packet capture (PCAP) support for troubleshooting SRX Series devices. On the Capture Packets page (Site > WAN Edge Packet Captures), you can select SRX devices from the WAN tab to initiate packet capture. The PCAP feature is already available for SSR Series devices. Packet capture is a tool that helps you to analyze network traffic and troubleshoot network problems. It captures real-time data packets traveling over the network for monitoring and logging.
Security: Support for Zscaler sub-locations
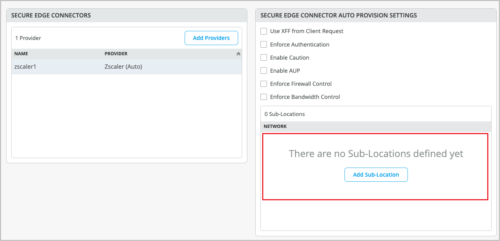
Mist supports configuration and provisioning of Zscaler sub-locations. A Zscaler sub-location is a child entity of the location object. Locations identify the various networks from which your organization sends its internet traffic. Sub-locations can be used for specific uses cases. For example, an organization can define a Zscaler sub-location for its corporate network, and another sub-location for its guest network, even if their traffic goes through the same GRE or IPSec tunnel. The organization can then use these sub-locations to:
- Implement different policies based on IP addresses.
- Enforce authentication for the internal corporate network, while disabling it for the guest network.
- Enforce bandwidth control for sub-locations while ensuring that unused bandwidth remains available to the parent location.
For each sub-location, you can specify gateway options and an internal network.
You can configure Zscaler sub-locations from the WAN Edge template (Organization > WAN Edge Templates) or from the WAN Edge configuration page (WAN Edges > WAN Edges > WAN Edge Name). The Add Sub-Location option will be available only when you select Zscaler as the Secure Edge Connector.
Dynamic packet capture support (SSR)
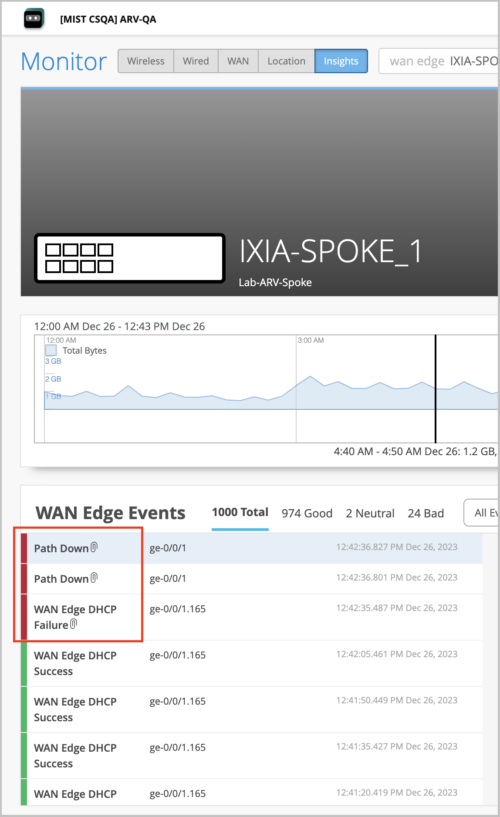
To improve your troubleshooting experience, Mist provides dynamic packet capture (dPCAP) support for SSR devices. Dynamic packet captures are automatically saved and available for you to download in the WAN Edge Events section on the WAN Edge Insights page. Events with a dynamic packet capture available are indicated by a paperclip icon next to the event name. To download the packet capture file, click that event and then click the Download Packet Capture button available in the Events Details section on the right.
Here are the events which can generate a dynamic packet capture for an SSR device:
-
Failure of the ARP request to next-hop gateway
-
DHCP address resolution failure
-
WAN Edge failure to establish BGP peering based on configuration
-
WAN Edge failure to establish SVR peering based on configuration
Support for switching local breakout paths when SLA thresholds are breached (SSR)
To improve your network monitoring experience with SSR devices, Mist now supports switching local breakout traffic from one path to another when the path does not meet the associated SLA requirements for the link latency, jitter, and loss parameters.
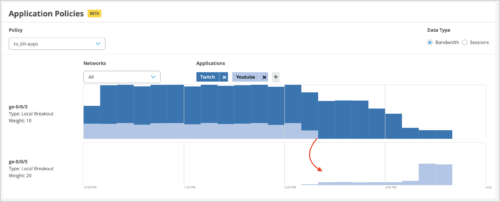
The SSR devices compare the SLA parameters (latency, jitter, and loss) for all the local breakout paths against the thresholds configured for these parameters for each application. Whenever a set threshold is breached (that is, a local breakout path fails to meet the associated SLA requirements), the traffic shifts to another path based on the traffic steering configuration. Any such shifts in traffic are displayed on the Application Routing Visibility graph on the Application Policy dashboard.
The following sample image shows a traffic shift from the ge-0/0/3 interface to the ge-0/0/5 interface because of an SLA threshold breach:
Configuration of this feature involves the following steps:
-
Configure the threshold values for jitter, latency, and loss in the Advanced Settings section on the Add Application screen (Organization > Applications > Add Applications). You must configure these parameters per application.
-
Configure the required traffic steering in the WAN Edges template associated with the site (Organization > WAN Edge Templates) or on the WAN Edge details page (WAN Edges > WAN Edges > WAN Edge Name).
-
Include the traffic steering configuration in the application policy associated with the site. You can do this from the WAN Edges template (Organization > WAN Edge Templates) or on the WAN Edge details page (WAN Edges > WAN Edges > WAN Edge Name).
This feature is already available for SVR paths.
Enhanced policy framework with an expanded application list
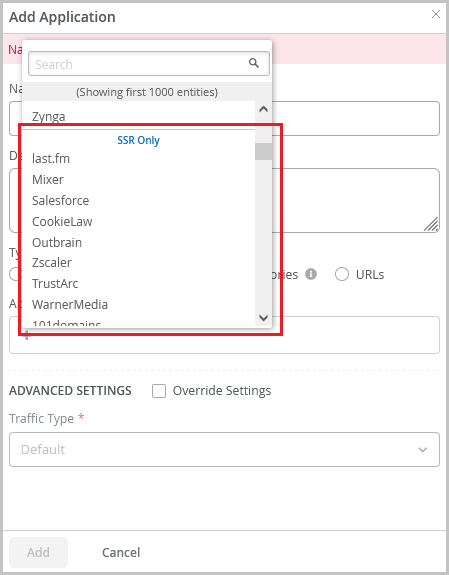
We have significantly expanded the list of applications in Mist cloud to include thousands of applications supported by the WAN edge devices. The application list now groups the applications under the following sections for easier selection:
- Applications
- SSR Only
- SRX Only
On the application creation screen (Organization > Applications > Add Applications), you can now view and select these applications and use them in Application Policies to block traffic or make traffic steering decisions.
Previously, Mist supported application traffic steering only for a set of curated applications, though it displayed all the learned applications on the Insights page.
Support for replacing an SSR node in a high availability cluster
The Mist portal now supports replacing a faulty node with a new one in an SSR cluster. You can replace a node in an SSR cluster by using the Replace WAN Edge option on Utilities menu on the SSR cluster details page (WAN Edges > WAN Edges > WAN Edge Name).
On the Replace WAN Edge window, you can select the old faulty SSR node to be replaced and the new replacement node’s MAC address (from the MAC Address of available WAN Edge drop-down list). After you click Replace, Mist takes about 15 minutes to complete the replacement operation.
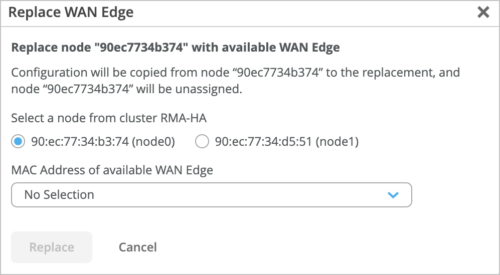
Before replacing the SSR node, you must:
-
Remove the cluster fabric cables from the node being replaced and connect it to the new replacement node.
-
Ensure that the new replacement node is of the same model as the node being replaced.
-
The new replacement node has a firmware version greater than 6.0.
-
If you are replacing a node with a new out of the box SSR node, ensure that you:
-
Claim the new node to the same site where the SSR cluster is present.
-
Upgrade the firmware of the node to a version above 6.0.
-
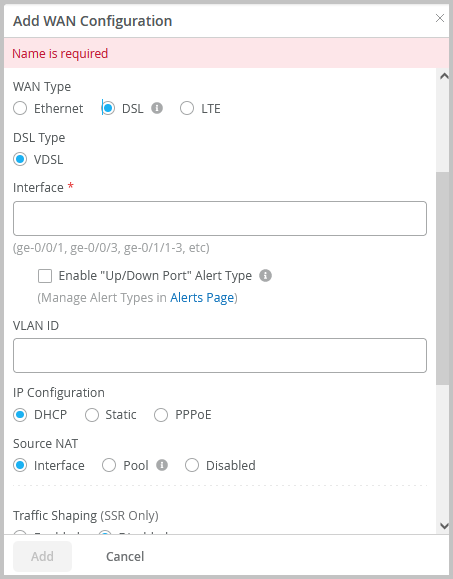
VDSL support for SRX Series devices
Mist now supports very-high-bit-rate digital subscriber line (VDSL) technology for SRX Series devices which have a DSL MPIM card installed. You can configure this from the WAN configuration section of the WAN Edge details page (WAN Edges > WAN Edges > WAN Edge Name) or WAN Edge Template (Organization > WAN Edge Templates). VDSL technology is part of the xDSL family of modem technologies, which provide faster data transmission over a single flat untwisted or twisted pair of copper wires.
Mist Edge
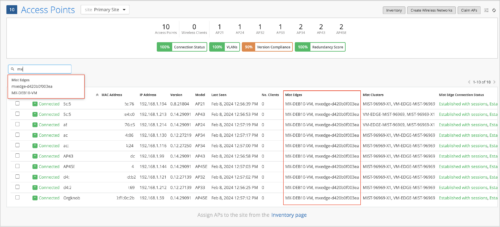
Search for APs by Mist Edge name
You can search for an access point (AP) by Mist Edge name, even if the AP has two or more tunnels to the Mist Edge. You can also sort the AP list by Mist Edge name. Previously, the AP page did not support search by Mist Edge names when there were multiple tunnels associated.
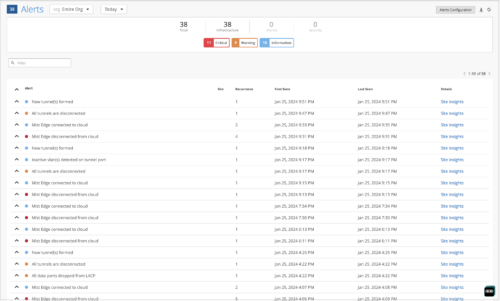
Mist Edge events on the Alerts page
The Monitor > Alerts page now displays the Mist Edge events. It displays critical, warning, or information messages based on the events.
-
Critical messages: Displayed for events such as disconnection of Mist Edge from cloud, Mist Edge service crash, and disconnection of all tunnels.
-
Warning messages: Displayed for events such as Mist Edge service failures, and detection of high CPU, memory, and disk usage.
-
Information messages: Displayed for events such as formation of tunnels, completion of Mist Edge connection to the cloud, and detection of inactive VLANs on the tunnel port.
Support for autopopulating tunnel IP addresses in Mist Edge cluster
The Mist Edge Cluster creation page autopopulates the Hostnames/IPs field in the Tunnel Termination Services section with the Tunnel IP address configured in the Mist Edge selected. You no longer need to manually enter the unique Tunnel Termination Services IP addresses for the Mist Edges included in the cluster. The autopopulate feature prevents any entry of incorrect Tunnel IP addresses. When you remove a Mist Edge from a Cluster, the associated Tunnel IP address gets removed.
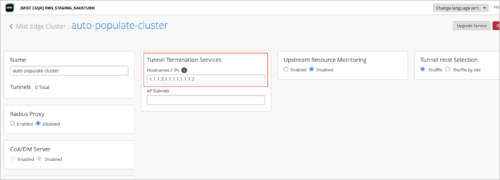
In the case of a remote Mist Teleworker, you need to manually enter the external IP of the Mist Edge.
Option to download Mist Edge VM ISO image
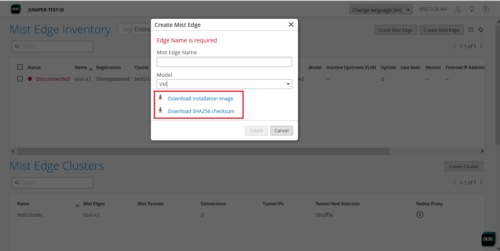
We have made the virtual Mist Edge deployment easier by providing a download link for the Mist Edge Virtual Machine (VM) ISO image on the Create Mist Edge page. Previously, you had to search for the download link in the Mist Edge documentation. Using the virtual Mist Edge solution, you can run Juniper Mist Edge as a hypervisor on VMware to implement a virtual Mist Edge architecture using a Juniper Mist Edge appliance as virtual machine (VM). For added security, we also provide an option to download an SHA-256 checksum which helps you ensure that the copy of the VM image downloaded is not tampered with.
Support for replacing Mist Edge
We have introduced an option to replace a Mist Edge in your network with a new Mist Edge. The new option, Replace Mist Edge, is available on the Utilities menu on the Mist Edge details page.

Clicking the Replace Mist Edge option takes you to the Replace Mist Edge page from where you can select the new replacement Mist Edge.
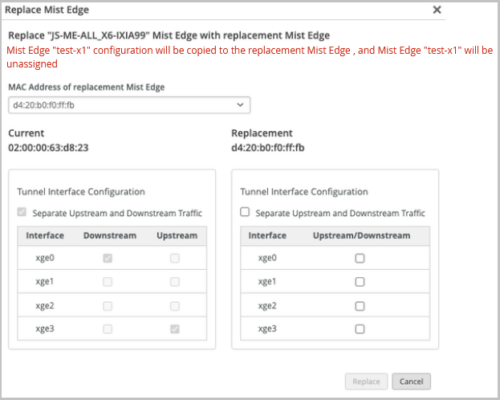
Before initiating the replacement process, ensure that the new replacement Mist Edge is:
-
Claimed but is not assigned to any site.
- Present in the inventory.
Configurations on the old Mist Edge that is being replaced are copied to the new replacement Mist Edge. Also, when the replacement activity is completed, the Mist Edge that is replaced is unassigned from its site. Though the port configuration is copied to the new replacement Mist Edge, you can modify the arm-mode. In the new Mist Edge, you can choose to use separate upstream and downstream ports (dual-arm mode) or a single port to handle both upstream and downstream traffic (single-arm mode).
Simplified upgrade workflow for the Mist Edge services
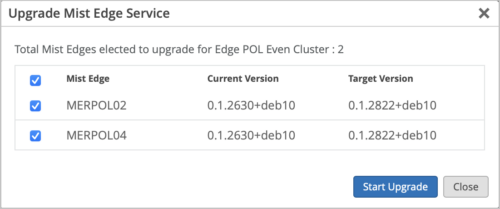
While upgrading the Mist Edge service pack, you no longer need to select a target version. Mist automatically identifies the latest recommended target version for you to initiate the upgrade. This feature prevents you from accidentally selecting a version which is not recommended.
You can access the Mist Edge service upgrade window from the Mist Edge details page (from the Utilities menu) or from the Mist Edge Cluster details page. The upgrade window displays the Mist Edge Name, the current version, and the target version. You just need to select the device row and click Start Upgrade. If you are upgrading a Mist Edge cluster, you might see multiple device rows (one for each Mist Edge device in the cluster) on the upgrade window. You can choose to upgrade one or more devices in the cluster. For a Mist Edge upgrade, you will always see a single device row for selection.
The Mist Edge does not recommend any target version if the Mist Edge selected for upgrade is already running the latest service pack.
Network Observability and Business Intelligence
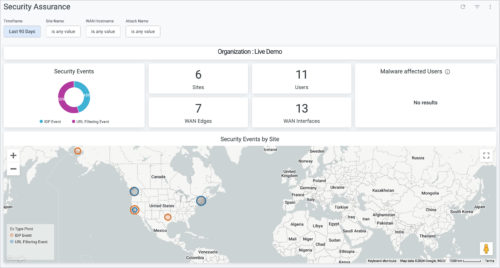
Security Assurance Dashboard
We have introduced Security Assurance Dashboard, a new WAN security dashboard powered by Premium Analytics. This dashboard provides crucial security insights derived from the ‘URL Filtering’ and ‘Intrusion Detection and Prevention System (IDS/IPS)’ events generated by the Juniper Session Smart Routers or SRX Firewalls with Advanced Security Pack. You can access this dashboard from the WAN section on the Premium Analytics page (Analytics > Premium Analytics).
